Josh Gabriel and Dave Dresden comprising of the duo Gabriel & Dresden out of San Francisco have been on the electronic music and DJing scene for over two decades.
Their latest offering in the form of Remedy would make you think they are fresh on the scene with indie-inspired, current beats that are uplifting. In today’s short-sound-bite, single-track, short-attention-span mode of listening, the approach of each track blended into another is daring, but works really well. Not only does each track stand on its own merit it is stitched se well as an album that it will suck you in and take you on a fifty-minute journey that sneaks up on you before you realize it is over. The distinct vocals lent by Sub Teal (Brittany O’Neil), Jan Burton and rising star Centre compliment each track and make it unique.
The opening track “No One’s To Blame” sets the scene with simple synth, retro electro beats and unique vocals from Sub Teal. Centre’s soft, almost early vocals on “Remember” create a subtle tension. This along with “Falling Forward” and “All I’ve Got,” bring a refreshed flavor to the refined sound of Gabriel & Dresden sound. “Keep On Holding” brings us to somewhat darker vocals of Jan Burton but combined with uplifting sound and sharp beats by the duo take you sense on a bit of a trip. Sub Teal’s (Brittany O’Neil) solo vocals. “Will I Change” steal the show and are probably the highlight of the entire album. The strong club beats blending into “Coming On Strong” will get you and keep you on the floor – if not have you moving in your seat. “Luna” and “Twelve” are the only two tracks without vocals and they both provide a nice transition flow within the album. “Luna” is a more upbeat with a retro feel while “Twelve” has almost a retro techno sound that builds slowly into the big finish of the album with “Something Bigger”. This track has the most variability and tension to it with a high energy intro and body with slow haunting vocal breaks from Sub Teal (Brittany O’Neil).
According to the duo: “This is an album inspired by the comfort we can find when wrapped in nature”. I would say they hit the mark on what they were trying to achieve. This is a fantastic album and was on top of my list for 2020!
Review: This wine is fresh and fruity. It is very clear, light bodied with a beautiful tawny colour. It consists of a strong fruity bouquet to the nose. Its pleasant earthy aroma almost like soil after the first rain could be attributed to it being aged in concrete vats. This complimented with its strong mushroom and mint notes makes is a very delicious wine to taste. With 13 % alcohol, it has beautiful long legs. This adds to the drama when drinking this with as it almost feels infused. This would make a fantastic pairing with white meets; it would work really well as an aperitif ; and can also be enjoyed with an assortment of smoked meats and cheeses.
Keeping up with the age old tradition, this chapter will take you through creating a “hello, world” rails application. The application will displays the words “hello, world!” in a web browser. We will develop the application in our development environment and then push it live in the cloud.
As before the rails new command creates the skeleton of everything you need in a Rails application. To start log back into you’re the AWS Console using the IAM credentials you created earlier. Go into the Cloud9 service and pick the rails-dev environment you created earlier. Click on “Open IDE” and Cloud9 will boot up your rails-dev environment and connect you to it. Create the environment directory for your Rails projects if it doesn’t already exist and then change into the directory.
# Making an environment directory for Rails projects
# These steps are not needed on the cloud IDE.
$ cd # Change to the home directory.
$ mkdir environment # Make an environment directory.
$ cd environment/ # Change into the environment directory.
For the benefit of the Windows users macOS users who have never dared to open a shell terminal (This may be a surprise to some, but the OS X kernel is based in the Carnegie Mellon University Mach OS, which was itself derived from Berkeley Software Distribution (BSD) UNIX), below are some common Unix/Linux commands to get you going:
Description
Command
Example
list contents
ls
$ ls -l
make directory
mkdir <dirname>
$ mkdir environment
change directory
cd <dirname>
$ cd environment/
cd one directory up
$ cd ..
cd to home directory
$ cd ~ or just $ cd
cd to path incl. home dir
$ cd ~/environment/
move file (rename)
mv <source> <target>
$ mv foo bar
copy file
cp <source> <target>
$ cp foo bar
remove file
rm <file>
$ rm foo
remove empty directory
rmdir <directory>
$ rmdir environment/
remove nonempty directory
rm -rf <directory>
$ rm -rf tmp/
concatenate & display file contents
cat <file>
$ cat ~/.ssh/id_rsa.pub
Scaffold Hello World
The next step is to scaffold the first application using the rails command. Here you can explicitly include the Rails version number as part of the command. This firstly ensures that you are using the same version of Rails that you installed earlier to create the application. This also gives you the flexibility install and work with multiple versions of rails. A developer who is working on multiple Rails projects and versions can work form the same development machine. This is the power of Rails!
First make sure you are in the “environments” directory:
$ cd ~/environment
Create the first rails application by typing:
$ rails _6.0.2.2_ new hello_world
Now sit and watch the magic happen!
Rails creates all the structure that you need to get from ground zero to a minimal functioning application in very little time. This is one of the many advantages of Rails. Moreover, since the directory structure created by Rails is standard and common to all Rails application, you can get your bearings almost immediately when looking at someone else’s code.
We will discuss and learn about almost all the files and folders that Rails has just created for you in the remainder of these session. Below however is a list and a short description of some of the more predominant files and folders:
File/Directory
Purpose
app/
Core application (app) code, including models, views, controllers, and helpers
app/assets
Applications assets such as Cascading Style Sheets (CSS) and images
bin/
Binary executable files
config/
Application configuration
db/
Database files
doc/
Documentation for the application
lib/
Library modules
log/
Application log files
public/
Data accessible to the public (e.g., via web browsers), such as error pages
bin/rails
A program for generating code, opening console sessions, or starting a local server
test/
Application tests
tmp/
Temporary files
README.md
A brief description of the application
Gemfile
Gem requirements for this app
Gemfile.lock
A list of gems used to ensure that all copies of the app use the same gem versions
After creating a new Rails application, the next step is to use Bundler to install and include the gems needed by the app. Bundler is run automatically (via bundle install) by the rails command. In this section we will make some changes to the default application gems and run Bundler again.
This involves opening the Gemfile with a text editor. In the cloud IDE, this involves clicking the arrow in the file navigator to open the “hello_world” application directory and double-clicking the Gemfile icon.
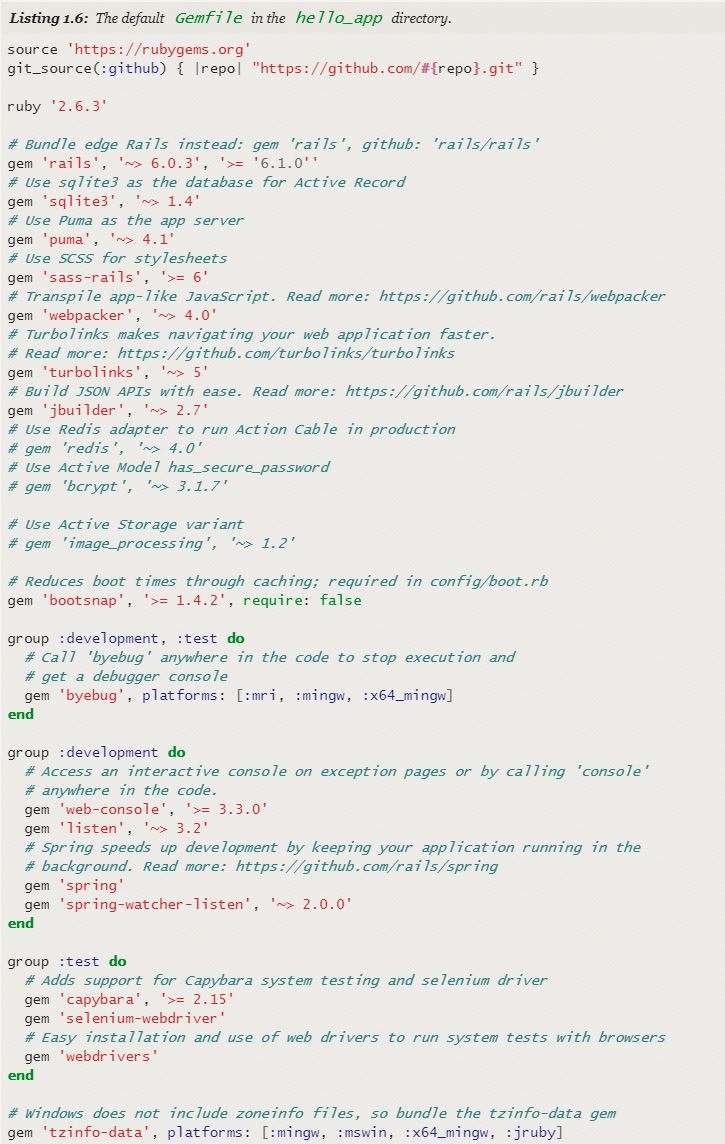
The Gemfile is written in Ruby and will look something like below. We will review Ruby syntax in detail in future chapters.
The default Gemfile in the hello_world directory.
You will not that many of these lines are commented out with the hash symbol #. This means that that these gems are not installed or needed. For now, we will use the default gems.
Before we do into the details of the Gemfile below are some common uses of the “gem” command.
Unless you specify a version number to the gem command, Bundler will automatically install the latest requested version of the gem. This is the case, for example, in the code
gem ‘sqlite3’
There are also two common ways to specify a gem version range, which allows us to exert some control over the version used by Rails. The first looks like this:
gem ‘capybara’, ‘>= 2.15’
This installs the latest version of the capybara gem (which is used in testing) as long as it is greater than or equal to version 2.15 – even if it is version 7.2 as a major release.
The second method looks like this:
gem ‘rails’, ‘~> 6.0.2.2’
This installs the gem rails as long as it’s version 6.0.2.2 or newer but not 6.1 or newer.
In other words, the >= notation always installs the latest gem, whereas the ~> 6.0.2.2 notation will install the latest version of 6.0.2 in the same release version but not 6.1.0.10 as the minor release.
Unfortunately, experience shows that even minor releases can break Rails applications, so for this Ruby on Rails Tutorial we will err on the side of caution by including exact version numbers for all gems or use the most up-to-date version of any gem in the same release, including using the ~> construction in the Gemfile.
Converting the Gemfile to use exact gem versions results in the Ruby code shown below. A few things to note:
Arrange for the sqlite3 gem to be included only in a development or test environment. This will prevent future potential conflicts with the database used by Heroku.
Comment out the final line because it is specific to Microsoft Windows and results in a potentially confusing warning message on non-Windows systems. You should keep this line uncommented if you are running Rails on a native Windows system.
Removed the line specifying the exact Ruby version number. If your app fails to work without that line, you should definitely restore it.
A Gemfile with an explicit version for each Ruby gem will look something like this.
Before you edit your Gemfile make sure you back it up. In command line do the following:
$ cd ~/environment/hello_world/
$ cp Gemfile Gemfile.bak
Once you have made your change to the Gemfile save it and install the gems using “bundle install” command
$ cd hello_world/
$ bundle install
Once the bundle command is completed your application will have all the updated “gems” for you to run the application.
There is a chance that when you run the “bundle install” command you get a message saying you need to run “bundle update” first. In this case you should run “bundle update: before you rung “bundle Install”.
Running the Rails Server
Rails comes bundled a local webserver to assist us in developing you application. This wen server can be sterted using the “rails server” command. However, before running rails server, it’s necessary enable allowing connections to the local web server. To achieve this, you should navigate to the file config/environments/development.rb and ensure the following two lines are included in the “development.rb” file. If not, simply add them.
Rails.application.configure do
.
.
.
# Allow connections to local server.
config.hosts.clear
end
Run the “rails server” command in a second terminal tab so that you can still issue commands in the first tab. You can shut the server down using Ctrl-C
$ cd ~/environment/hello_world/
$ rails server
=> Booting Puma
=> Ctrl-C to shutdown server
To view the result of rails server on a native OS, paste the URL http://localhost:3000 into the address bar of your browser.
To view the result of rails server on a native OS, paste the URL http://localhost:3000 into the address bar of your browser.
On the cloud IDE If you don’t have the Run Configuration open, make sure you open a “New Run Configuration” tab. Then go to Preview and click on Preview Running Application, and then open it in a full browser window or tab. You will see the following message in the browser:
Congratulations! You have scaffold and launched your first Rails application!
We will start with creating a rails development environment on AWS Cloud9. There are many advantages to this. Cloud9 allows you to develop within a web browser from anywhere without being tied down to a workstation. All the structure you need to start development is already available and as a developer you do not have to spend time in installing and configuring Ruby, Rails and other associated supporting software and libraries. Cloud9 also provides an easy to use cloud IDE that runs in the browser and easily integrates with your development environment.
The cloud IDE includes three essential components needed to develop web applications: a command-line terminal, a filesystem navigator, and a text editor. The cloud IDE’s text editor also supports a “Find in Files” global search feature that is important to navigating through Rails project.
AWS Cloud9 environment contains well integrated tools that are essential to develop and manage a Rails application including Ruby, RubyGems, Git, Heroku and others.
Steps to Get Started with AWS
Below are the steps for getting started with the AWS Cloud9 development environment:
If you already have an AWS account you can just sign in; or to create a new free account at AWS Cloud9.
The AWS account that you have created is your root account. It is better and more secure for you to create a secondary account through AWS Identity and Access Management (IAM). IAM enables you to manage access to AWS services and resources securely and allow other users and groups to temporarily access your services.
Once you have created the IAM account sign into the AWS Console using the 12 digit Account ID and IAM User Name.
Once logged in to the AWS console select Cloud9 from the list of AWS Services.
Once in the Cloud9 service click in “Create Environment” to create a new development server:
Choose an environment name. This could be the same as your project name. Like: “rails-dev” and fill in the description.
On next page select settings;
Create a new EC2 instance for environment (direct access): Launch a new instance in this region that your environment can access directly via SSH.
t2.micro (1 GiB RAM + 1 vCPU): Free-tier eligible. Ideal for educational users and exploration.
Ubuntu Server 18.04 LTS and not Amazon Linux.
Choose a half-hour of time period to auto-hibernate your environment and prevent unnecessary charges.
On the next page validate your settings and “Create Environment”.
In the top window click on “+” to open Preferences tab
Using two spaces for indentation is a near-universal convention in Ruby. So, change the editor to use two spaces instead of the default four. This takes effect immediately; you don’t need to click a “Save” button.
Installing Rails
The development environment you just created includes everything you need to get started except for Rails itself. This is by design, as different project might run on different versions of Rails to be installed. For the purpose of these sessions we will install and run Rails version 6.0.2.2.
However before we do that we will do a little preparation by adding configuration settings to prevent the time-consuming installation of local Ruby documentation. This step needs to be done only once per system.
$ echo “gem: –no-document” >> ~/.gemrc
Next install Rails using the RubyGems package manager.
$ gem install rails -v 6.0.2.2
Here the -v flag ensures that the specified version of Rails gets installed. You can confirm that the installation succeeded by passing the -v flag to the rails command itself.
$ rails -v
One additional configuration step is to install Yarn, a program to manage software dependencies. In cloud IDE, you can run this command, which downloads and executes the necessary commands from the Learn Enough CDN:
I had started a Rails Exposed series back in 2014 when I was elbow-deep into managing my digital content management venture (maGNOma) and prototyping a career management platform (ProgessionalYou). Back then, as I learned how to architect and develop Software as a Service (SaaS) platforms using Ruby on Rails (RoR – or simply put, Rails) – version 3 at that time, I became more and more of a converted of Rails’ simple approach and implementation of fundamental principles like: “not repeating the code”, Model View Controller (MVC), Object Relational Mapping (ORM). As a bootstrapping entrepreneur, I was also pleasantly surprised by how well Rails aligned with the Agile, Lean Startup and a Minimal Viable Product (MVP) approach.
Many things have changed since then with the introduction of cloud enablement platforms and other cloud application development tools, increasing focus on security, scaled approach to application deployment through containerization and application management through DevOps.
While many things have changes, most of the foundational principles that made Rails such an appealing development framework to quickly scaffold and build dynamic web applications remain the same. It is for this reason that Rails continues to be the development framework of choice for applications such as Airbnb, SoundCloud, Disney, Hulu, GitHub, and Shopify – as well for a range of freelancers, independent development shops, and start-ups.
Rails stands apart for its elegance, power, and integrated approach to web application development. Using Rails, even novice developers can build a full-stack web application without ever leaving the framework. Rails also provides the flexibility of serving as a great back-end layer of an enhanced technology stack to build content rich front-end applications, mobile app or expose API for real time data access, content streaming and other micro services.
Over the years, Rails has matured. It is now not plagued with problem and defects that come with some of the newer development technologies such as Node.js, React or Angular. These are not only far more limited in capability but are also changing at a dizzying pace that is not conducive to sustaining a stable web application. Compared to Rails, legacy Java development platforms such as J2EE or even Spring are far too complex for a more iterative approach of quickly scaffolding and prototyping a MVP.
“Back then the complexity merchant of choice was J2EE, but the complaints are uncannily similar to those leveled against JavaScript today… The core premise of Rails remains in many ways as controversial today as it was when it premiered. That by formalizing conventions, eliminating valueless choices, and offering a full-stack framework that provides great defaults for anyone who wants to create a complete application, we can make dramatic strides of productivity.”
Rails does not only continue to mature, it continues to innovate. For example, the Rails 6 release includes major new features for email routing, text formatting, parallel testing, and multiple-database support. A big part of Rails 6 is being “scalable by default”, which means that Rails can easily scale to user growth and demands of a web application while maintaining rock-solid dependability. It is for this reason the wildly popular developer platform GitHub, the hugely successful online store-builder Shopify, and the collaboration tools such as Basecamp are not only built on Rails; they work with pre-release versions of Rails. This helps with new versions of Rails being vetted and thoroughly tested before general availability.
Amazon Web Services (AWS) also now facilitates a seamlessly integrated cloud development environment through Cloud9. The resulting workspace environment comes preconfigured with most of the software needed for Ruby on Rails web development, including Ruby, RubyGems, and Git. The Rails cloud IDE environment will also seamlessly integrate with GitHub for full backup of code and easier collaboration.
Rails deployment ecosystem has also matured rapidly in the past few years, and now there are several great options. These include shared hosts or virtual private servers running Phusion Passenger (a module for the Apache and Nginx26 webservers), full-service deployment stacks from companies such as Engine Yard and Rails Machine, and cloud deployment services such as Engine Yard Cloud and Heroku.
The intent of this series is not to teach someone how to become a full stack Rails developer. The posts that will be included in this series will serve as a quick reference guide to refresh or validate Rails development principles, basic Ruby expressions and commonly used Rails commands. This is by no means an all-encompassing Rails learning guide and should not be considered to be one. For more detailed sources to learn Rails development refer to:
In this series I will reference the above to as source material. However there are many others that can be discovered on your own through a quick internet search.
Review: This wine is just as fun and light hearted as the label! The wine has a distinct aroma of bubblegum as you pour, followed by notes of bananas bread and strawberries. This is a really easy drinking wine with all the characteristics and spirit of a Beaujolais Nouveau. Chill it for a minute or so before serving and enjoy on it own or alongside a thin-crust pizza or flat bread. You will find this wine to be an absolute treat for you taste buds! You may however have to wait for the 2021 vintage 🙂