Monthly Archives: March 2021

Rails Rehashed: Chapter 6. Deploying with Heroku

Overview of Deploying

An application is useless sitting on your personal workstation or on a development server in the cloud.  It needs to be deployed into a production environment so that it can be utilized by its consumers. Especially if you are working in a lean start up project, you need to get you MVP out to the user and solicit feedback as early as possible.

When deploying from a local workstation, Capistrano works well.  However, Rails deployment tools on the cloud have matured quite rapidly.  There are now a number of viable options to use to be able to effectively deploy your code into production. These include Phusion Passenger, Engine Yard Cloud and Rails Machine.  We will however use Heroku

Heroku is a hosted platform built specifically for deploying Rails and other web applications and makes deploying Rails applications easy and integrates well with Git.  Heroku will work for the purposes for these tutorial.  Once you get to deploying your commercial application, you can research and decide what deployment tool will work best for you.

Update Gem File

Heroku uses the PostgreSQL database.  This means that you will need to update you need update your Gem file to include pg gem in the production environment to allow Rails to talk to Postgres.

group :production do

  gem ‘pg’, ‘1.2.3’

end

SQLite database isn’t supported at Heroku.  So make sure that the sqlite3 gem is not included in production environment and only included in development and test environments. 

# Use sqlite3 as the database for Active Record

#gem ‘sqlite3’, ‘~> 1.4’

group :development, :test do

  gem ‘sqlite3’, ‘~> 1.4’

  gem ‘byebug’,  ‘11.1.3’, platforms: [:mri, :mingw, :x64_mingw]

end

To prepare the system for deployment to production, we first run a special bundle config command to prevent the local installation of any production gems (which in this case consists of the pg gem)

$ bundle _2.2.13_ config set –local without ‘production’

Or

$ bundle config set –local without ‘production’

$ bundle _2.2.13_ install

Or

$ bundle  install

Note: if you get errors installing ‘pg’, it is probably because you are missing lib-pg-dev library.

$ sudo apt-get install libpq-dev

Note: These are small changes do you done necessarily need to make a branch topic.  You can simply make changes to your master and then commit them into Git and push them into GitHub. However,  as you are actively working on the project, I suggest you get into the habit of coding best practice and make a branch topic that you can merge with the master after you have tested your changes.

$ git branch                                                                     # Check if you have any current branches

$ git checkout -b Setup-Deployment            # Create a new branch called  and switched to branch

$ git branch                                                                     # Make sure you are working in the new branch topic

Work in this branch and make your changes

$ git status                      # Get a summary of all the changes that you have made

$ git commit -a -m “Check in all the changes made and tested <date>”

$ git checkout master    # Switched to branch ‘master’

$ git branch                     # Make sure you are in master and get name of branch to merge

$ git merge Setup-Deployment

$ git branch -d Setup-Deployment         # Deleted branch Setup-Deployment if desired

$ git push                                                   # Push updates to GitHub

Install Heroku

The first thing to do to deploy Heroku is to create and configure a new Heroku account. Then check to see if your system already has the Heroku command-line client installed:

$ heroku/7.50.0 linux-x64 node-v12.16.2

This will display the current version number if the Heroku command-line interface (CLI) is available.  On a Cloud9 IDE, you can install Heroku CLI using the following command:

$ source <(curl -sL https://cdn.learnenough.com/heroku_install)

You can now display the Heroku version by typing the following command:

$ heroku –version

heroku/7.50.0 linux-x64 node-v12.16.2

Once you have verified that the Heroku command-line interface is installed, use the heroku command to log in with the mail address and password you used when signing up (the –interactive option prevents heroku from trying to spawn a browser)

$ heroku login –interactive

Now use the ‘heroku create’ command to create a place on the Heroku servers for the sample app to live.

$ heroku create

Creating app… done, ⬢ blooming-bayou-[75897]

https://blooming-bayou-%5B75897%5D.herokuapp.com/

https://git.heroku.com/blooming-bayou-%5B75897%5D.git

This command creates a new subdomain just for our application, available for immediate viewing.  The next step is to deploy  the application into this subdomain.

Heroku deployment, step 1

The first step is to use Git to push the master branch up to Heroku:

$ git push heroku master

You may get the following error:

remote:  !     You are trying to install ruby-2.6.3 on heroku-20.

remote:  !    

remote:  !     Ruby ruby-2.6.3 is present on the following stacks:

remote:  !    

remote:  !     – cedar-14

remote:  !     – heroku-16

remote:  !     – heroku-18

This indicates that your app is built on ruby that is not supported with heroku-20.  heroku-20 supports the following versions of ruby:

2.6.6, Rubygems: 3.0.3

2.7.2, Rubygems: 3.1.4

3.0.0, Rubygems: 3.2.3

To get around this error use a different heroku stack

              $ heroku stack                             # Dislay a list of heroku stacks available

              $ heroku stack:set heroku-18    # Set heroku stack to heroku-18

You will see a series of warning that you can ignore for now.  When the deployment is completed you can use the URL  that  was created when you originally ran “heroku create”.  To find the URL again you can run the following command:

$ heroku apps:info

This will give you a similar output:

.

.

.

Web URL:           https://pacific-escarpment-%5B12345%5D.herokuapp.com/

Type  the URL into you favorite browser and you will see “Hello World!” pop up in the browser.  Congratulations! You have just deployed you first Rails application for everyone to access.

In future session we will talk about how to host a Heroku site using a custom domain instead of a herokuapp.com subdomain.  But for now, job well done!

Naming Applications on Heroku

You can find a comprehensive list of Heroku commands on the Heroku Dev Center in the Heroku CLI Commands section.  One common command is to rename your application.  When you log into Heroku  you will see a list of applications that you have deployed through Heroku.  Heroku uses the generic name it gives to your application as the subdomain.  This is however useless commercial application that you want people to easily access.  You can change rename your application using the following command:

$ heroku rename <new_name_for_your_rails_application>

However for the reason that your “Hello World” application has no access management built in it, if you do want to rename your application, make sure it reasonably secure by using a random or obscure subdomain.  Heroku also supports custom domains.  Go to the Custom Domain Names for Apps on the Heroku Dev Center to get more information about custom domains. 

To see a list of Heroku commands you can also run:

$ heroku help

Wrap Up

This is a good point to take a pause and recap on what you have covered in the previous chapters.  In summary we have learned you to:

  • Set up a development environment
  • Scaffold a Rails application
  • Make functional changes to the default application
  • Version control locally and backup code to an online repository
  • Deploy the application for others to access online

At this time it would also be beneficial to summarise some key characteristics of Rails:

  • Rails is a web development framework written in the Ruby programming language
  • Rails can easily be installed and used do develop web applications using a preconfigured cloud environment
  • Rails default application can easily be generated with all the supporting structure with the a single “rails” command
  • Rails application comes with a local web server and can be run locally with a “rails server” command
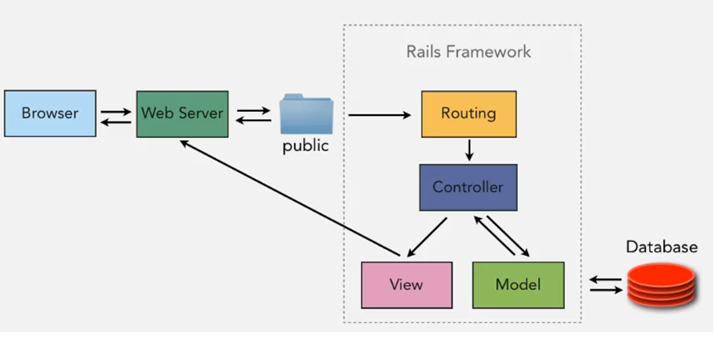
  • The Model, View, Controller (MVC) framework makes it easy to manipulate controller actions and modify the root route to create a custom web application
  • Rails is well integrated with git to locally version control the application and protect against coding errors and mishaps
  • Rails is well integrated with GitHub to backup the application by pushig the version controlled code onto cloud resources
  • Rails is well integrated with resources like Heroku to quickly deploy the application using cloud resources

Read: Chapter 7. Build a Rails Application in Less Than a Day

Go Back to: Chapter 5. Version Controlling with Git and GitHub

Go back to: Rails Rehashed


Rails Rehashed: Chapter 5. Version Controlling with Git and GitHub

Git Overview

Now that we have a working “Hello World” application, we need to be able to secure it from calamities such as server crashes, accidentally deleting files and even making changes from which we would want to back out.  Placing your application source code under version control is the best way to protect it. Version control systems allow tracking of changes to the code, collaborating with other developers on the project and rolling back changes.

Git is one of many options for a version control system.  Some other options include: Subversion, CVS, Helix, ClearCase and many others.  Git was originally developed by Linus Torvalds to host the Linux kernel.  It has however now become one of the most popular system amongst Rails and Java development communities with popular implementations like GitHub and Bitbucket.

Git Setup and Configuration

The AWS cloud IDE includes Git by default, so no installation is necessary.  You only need to do setup and configuration to make Git work for your projects.

Before using Git, you should perform a few one-time setup steps. These are system setups, meaning you have to do them only once on your development server.

The first (and required) step is to configure your name and email address, as shown below:

$ git config –global user.name “Your Name”

$ git config –global user.email your.email@example.com

Note that the name and email address you use in your Git configuration will be available in any repositories you make public.

You can check you Git configurations with a simple list command

$ git config –list or git config -l

The next step is to prevent Git from asking for your GitHub password every time you want to use commands like push or pull.  This is easily done by using the below command to configuring Git to remember passwords for on hour.

$ git config –global credential.helper “cache –timeout=3600”

First-time Repository Setup

Once the basic configurations are done the fist step in using Git is to create a new repository.  This is done by navigating to the root directory of you application and initializing a new repository:

$ cd ~/environment/hello_world

$ git init

Note that Git outputs a message that the repository has been reinitialized. This is because, as of Rails 6, running rails new automatically initializes a Git repository.  Although, the git init step isn’t technically necessary in our case, this won’t hold for general Git repositories.  It is therefore always good to initialize the repository.

The next step is to add all the project files to the repository

$ git add -A

This command adds all the files in the current directory apart from those that match the patterns in a special file called .gitignore.  Therefore be very careful when you launch this command and make sure that you are in the right project directory – especially if you are working on multiple projects.  The rails new command automatically generates a .gitignore file appropriate to a Rails project, but you can add additional patterns as well.

Run the below command to see what is in your .gitignore file.  We will discuss changing this file in the following chapters.

$ cd ~/environment/hello_world

$ cat .gitignore

The project files added to the Git repository are initially placed in a staging area, which contains pending changes to your project. We can see which files are in the staging area using the status command:

$ git status

The output from this command will look something like this:

On branch master

No commits yet

Changes to be committed:

  (use “git rm –cached <file>…” to unstage)

        new file:   .browserslistrc

        new file:   .gitignore

        .

        .

        .

At the beginning of eh project you will see the entire project file structure in the list – except for what is called out in .gitignore.  Moving forward you will see in this list only changes you have made to the project.  It is a good idea to review this list carefully before you commit your changes to the Git repository.  To tell Git you want to keep the changes, use the commit command:

$ git commit -m “Initialize repository”

This command will produce the following output:

[master (root-commit) df0a62f] Initialize repository

.

.

.

The -m flag lets us add a message for the commit; if we omit -m, Git will open the system’s default editor and have us enter the message there.  It is a good practice to always use the –m flag to keep a reference for each commit. You can see a list of the commit messages using the log command:

$ git log

The command will generate an output similar to below:

commit a24240d36fa36652f94d9600647c26bcb2c6ccf0 (HEAD -> master)

Author: User Name <user@email.com >

Date:   Sun Mar 7 14:18:12 2021 +0000

    Initialize repository

For large projects (like open source projects) where you have multiple contributors an multiple check-ins, this list can get long and run in your terminal for a while.  Type q to quit the output from this command.  It is also important to note that Git commits are local to the development server (workstation) you are working on.

Git in Action

So what does all this version controlling in Git do?  Lets test out the value of version controlling by going through the below scenario example.

Suppose you’ve made some development changes and made incorrect edits or even deleted elements in your controller.

Simulate this my executing the following commands:

$ ls -ltr app/controllers/                           # List all the files in you controllers directory

$ cd app/controllers                    # Change to the directory you are working in

$ cp application_controller.rb application_controller.rb.bak    # Backup you controller file

$ rm application_controller.rb   # Delete the controller file

 $ ls – ltr                                        # List all the files to not application_controller.rb is deleted

Now if you try to start you application and view it in a browser the browser will through a series of errors:

Puma caught this error: uninitialized constant ActionText::Engine::ApplicationController (NameError)

.

.

.

In a live web application situation this would cause a high severity customer issue and potential business loss.  You can quickly track down what happened by comparing the status of your application to last stable code that was checked into Git:

$ git status

This command will give you an output like below:

On branch master

Changes not staged for commit:

  (use “git add/rm <file>…” to update what will be committed)

  (use “git checkout — <file>…” to discard changes in working directory)

        deleted:    app/controllers/application_controller.rb

Untracked files:

  (use “git add <file>…” to include in what will be committed)

        app/controllers/application_controller.rb.bak

no changes added to commit (use “git add” and/or “git commit -a”)

You see here that a file has been deleted, but the changes are only on the “working tree”; they haven’t been committed yet.  This means we can still undo the changes using the checkout command with the -f flag to force overwriting the current changes:

$ git checkout -f

Now if you list the file in the directory again you will note that you controller file is back in the directory

$ ls -ltr app/controllers/               # List all the files in you controllers directory

Try to run the application again.  You will  be able to pull up the “Hello World” browser page.  Congratulations you are the hero of you project team!

Using GitHub

Now that you have your project versioned controlled and secured with Git, what is the purpose of GitHub? Are they not the same thing?

In fact, Git hub offer similar functionality but  are used for two very  different purposes.  With Git, you can version control your project on your local machine.  GitHub, is a site optimized for hosting and sharing Git repositories.  Pushing your code onto GitHub serves as a full backup of your code in a remote location and it makes any future collaboration much easier in a development team.

To get started with GitHub simply sign up.  Remember to use the same email address that  you added earlier to your Git configuration.  Once you have signed up or signed in, click on the + sign dropdown menu and select “New repository”.

On the new repository page, fill the fields with the repository name: hello_world (use the same name as your project) and optional description, and take special care to select the “Private” option. After clicking the “Create repository” button, you should see a page with a series of commands for adding an existing repository to GitHub.

Use the following commands to push your committed project to GitHub:

$ git remote add origin https://github.com/<username>/hello_world.git

$ git push -u origin master

You will have to type your GitHub password, but you won’t the next time (for 3600 seconds/1 hour as configured above)

The above command tells Git to add you project to GitHub as origin master for your repository, and then push your repository up to the remote origin.

This will result the hello_world repository added to your GitHub account, with full commit history.

Some additional Git commands for your command kit:

$ git remote –v                            # View all current remotes

$ git remote rm destination       # Remove ‘destination’ remotes

Branch, Edit, Commit, Merge

Using Rails automatically creates a README.md file when you create a new rails application.  The filename extension .md, it is written in Markdown,23 a human-readable markup language designed to be easy to convert to HTML.  You can customize this README fie to add some specific information about your project.  Using Git it is possible to do this by following a branch, edit, commit, merge workflow.

Creating a branch effectively means creating a copy of the repository where we can make changes without modifying the parent files called the master branch.  You can create a branch using the checkout command with the -b flag:

$ git checkout -b modify-README          # Create a new branch called modify-README

# and switched to the new branch ‘modify-README’

$ git branch       # Lists all the branches with * identifying the currently active branch

After creating the topic branch, you can edit the README to add custom content as you desire.  With the changes made, you can take a look at the status of our branch:

$ git status

On branch modify-README

Changes not staged for commit:

  (use “git add <file>…” to update what will be committed)

  (use “git checkout — <file>…” to discard changes in working directory)

        modified:   README.md

no changes added to commit (use “git add” and/or “git commit -a”)

At this point, you could use git add -A, but git commit provides the -a flag as a shortcut for the (very common) case of committing all modifications to existing files:

$ git commit -a -m “Update the README file”

You have to be careful about using the -a flag improperly.  If you have added any new files to the project since the last commit, you still have to tell Git about them using git add -A first.

Note to write the commit message in the present tense.  Git models commits as a series of patches, and in this context it makes sense to describe what each commit does, rather than what it did. Moreover, this usage matches up with the commit messages generated by Git commands themselves.

Now that have committed your changes, you can merge the results back into our master branch

$ git checkout master    # Switched to branch ‘master’

$ git merge modify-README

Once you have merged in the changes, you can clean up your branches by deleting the topic branch

$ git branch -d modify-README                            # Deleted branch modify-README

It is not necessary to delete your topic branch.  You can keep working in your topic branch even after you have merged in the changes.  You can choose to merging in changes every time you reach a natural stopping point.

It’s also possible to abandon your topic branch changes, in this case with git branch -D:

$ git branch -D topic-branch      # Unlike the -d flag, the -D flag will delete the branch even

# though we haven’t merged in the changes.

Now that you have updated the README file, you can push the changes up to GitHub

$ git push

Or

$ git push -u origin master

Now if you log into GitHub and navigate to your “Hello_World” project, you will note that the date stamp on the README.md file is updated.  If you open the file you will also see the content updated.

You now know the basics of Git, GitHub and principles of code Branch, Edit, Commit, Merge and Push to manage your future Rails projects!

Read: Chapter 6. Deploying with Heroku

Go Back to: Chapter 4. Introduction to Model-View-Controller (MVC)

Go back to: Rails Rehashed


Rails Rehashed: Chapter 4. Introduction to Model-View-Controller (MVC)

MVC Overview

So you launched your new Rails application and you only see a generic static web page.  This is not very exciting! Is Rails not all that is has cracked up to be?

In order to answer this question at this stage, it would be helpful to get a high-level overview of how Rails applications work.  In the “Hello World” Rails application directory structure you will notice a directory called app/.  Under this directory you will notice, amongst other subdirectories, subdirectories called models, views, and controllers.  Rails follows the model-view-controller (MVC) architectural pattern, which enforces a separation between the data in the application (such as user information) and the code used to display it.  This is a common way of structuring a graphical user interface (GUI).

When interacting with a Rails application, a browser sends a request, which is received by a webserver and passed on to a Rails controller, which is in charge of what to do next.  In some cases, the controller will immediately render a view, which is a template that gets converted to HTML and sent back to the browser.  More commonly for dynamic sites, the controller interacts with a model, which is a Ruby object that represents an element of the site (such as a user) and is in charge of communicating with the database.  After invoking the model, the controller then renders the view and returns the complete web page to the browser as HTML.

Do not worry if these MVC interactions seem a bit abstract at this time. We will cover MVC in a lot more detail in upcoming chapters.

Make You Application Say “Hello, World!”

In order to make the application do what you want it to do, you will need to start manipulating the MVC framework.  In order  for your application to say “Hello World!”, we will need to make some small change to the Hello World application by adding a controller action to render the string “Hello World!” to replace the default Rails page.

As implied by their name, controller actions are defined inside controllers.  We will call our action hello and place it in the application controller.  Run the following command to make sure that your application controller is the only controller:

$ ls app/controllers/*_controller.rb

When you run he above command, you should get the following output:

              app/controllers/application_controller.rb

Open this controller file in the AWS IDE by dragging it from the listing side panel into a new file tab to view the current controllers.  You will not this file is empty.  It only contains the following lines:

class ApplicationController < ActionController::Base

end

This means that the controller has no instructions to provide to the application when a request is sent to it by the browser.  The application therefore simply displays the default web page.

To have your application say “Hello World!” add the below instructions to the controller. At this time  do nto be concerned about the Ruby syntax.  We will cover this in detail in the upcoming chapters.

class ApplicationController < ActionController::Base

  def hello

    render html: “Hello World!”

  end

end

The above syntax defines an action “hello” in the controller and includes the instructions to return the desired string. 

Next we need to tell Rails to use that action we just defined instead of the default page.  To do this, we will edit the Rails router, which sits in front of the controller and determines where to send requests that come in from the browser.  In particular, we want to change the default page, the root route, which determines the page that is served on the root URL.  Because it is the URL for an address like http://www.example.com/ (where nothing comes after the final forward slash), the root URL is often referred to as / (“slash”) for short.

The router is located in the following directory:

/app/hello_world/config/routes.rb

When you open the routes.rb file in a new file tab, you will note that the file only includes a comment directing us to the Rails Guide on Routing, which includes instructions on how to define the root route.

The syntax looks like this:

root ‘controller_name#action_name’

In the present case, the controller name is “application” and the action name is “hello”, which results in the code as shown below:

Rails.application.routes.draw do

  root ‘application#hello’

end

With controller file and  the router file saved restart you rails application with:

              $ rails server

Then go to Preview and click on Preview Running Application, and then open it in a full browser window or tab; and Voilà! You will see “Hello World!” displayed on the applicant root web page!

Read: Chapter 5. Version Controlling with Git and GitHub

Go Back to: Chapter 3. My First Rails Application

Go back to: Rails Rehashed