There exists an 11-acre precious parcel of farmland on 1299 Ridge Road, in our Community of Wolfville Ridge. Our community is adjacent to the thriving Town of Wolfville, NS, and is a proud agricultural farming, orchard, and vineyard community.
Recently a developer and outside investors have bought this 11-acre parcel and have plans to convert the existing historic barn that exists in this land into a warehousing operation. To achieve this they submitted a development application with the County of Kings to convert this irreplaceable agricultural land to commercial zoning.
If this land is converted to commercial zoning it will be lost for agriculture forever!
Due to climate change, soil degeneration and urbanization 65% of farmland have already been lost in the Maritimes, Quebec and Ontario since 1920.
Our community has been painstakingly fighting against this conversion application since last Summer. However, the County of Kings, in their short-sightedness approved this development application a month ago by a council vote of 5 to 4 – even though our county mayor Mr. Peter Muttart voted against this application stating that: This application for rezoning does not serve the neighboring agricultural community at all!
We are continuing to fight for this land to be preserved as agricultural land. We have now banded together as “Proudly Agricultural on the Ridge” and we have submitted an appeal to overturn this decision by the County of Kings.
Although we have been funding these preservation efforts personally thus far, we need additional financial support to fund the legal and professional planning consultation costs we will incur to have any fighting chance to win this appeal and overturn the County decision.
We have estimated that we need an additional amount of $10 Thousand to support our efforts and are reaching out to the larger local and global communities and individuals for help.
If you think that the preservation of our agricultural land is important and feel that the work we are doing as “Proudly Agricultural on the Ridge” is worthwhile, please help by providing whatever financial support you can through our funding campaign:
Whilst you are thinking about donating, please keep these facts in mind:
• Loss of agricultural land is one of the primary causes of the global food shortage we face as humanity today
• Only 3.2% of our land area in Canada can be used to grow crops
• In Canada alone, each year we lose 20,000 to 25,000 hectares of prime farmland
Should we have money left over at the end of this process, we will donate to one or more of the following: the Wolfville Area Foodbank, Open Arms or The Valley Community Learning Association in Kentville.
To everyone who supports our cause, whether you decide to donate or not, we thank you all graciously!
We will also have two local fundraising events: 4-7 pm on Saturday, Feb. 25, soup supper with live music, and a “in Ridge Stile” Brunch at 10:30-1:00 on Saturday, March 25th. Both of these events will be at the Gaspereau Community Hall.
In many ways 2022 was not much different from its preceding years and quite turbulent with cyber security threats. We witnessed intensifying security attacks on all the regular fronts including email scams, data breach, ransomware; and some newer trends focussing on crypto currency, NFT thefts and software supply chain attacks.
A report created by Splunk outlines that in 2022 consumers lost an estimated $6.1 billion to email scams. Some of the more noteworthy scams included fake MetaMask security emails, $2 million worth of NFTs stolen from OpenSea accounts, fake Ukraine charity scams and Amazon Prime Day scams.
Personal data breaches resulted in around 42 million Americans falling victim of identity fraud, with losses amounting to an estimated $52 billion. Enterprises like Samsung, Cash App, WhatsApp and Twitter all suffered from massive data breaches that caused material business losses and compromised millions of global citizens.
There will however be a shift in boardroom conversations and approaches to tackle cyber security threats this year. At the business level organizations have started to look at more then just being secure; but being holistically resilient against supply chain disruptions, climate impacts, economic uncertainty, and against cyber criminals who are constantly probing for vulnerabilities to breach an organization’s defence parameters.
Overall Resilience vs. Protection
This focus on a more holistic approach has also changed the role of security leaders in organizations. Cyber security leaders are now being compelled to consider interdependencies and options to correct the problems at the source – as opposed to the currently prevailing approach of setting up deterrents and gatekeepers. This new approach lends to baking security into the core of technology and its operations as opposed to bolting it on at the time of deployment as an afterthought.
These cyber security conversations are also varying in nature – depending on the understanding, maturity-level and the ability of an organization to pivot and avail these new approaches of defence that includes:
AI-driven cyber security automation
A zero trust framework
DevSecOps practices
Some long-established enterprises with lesser flexibility and material technical debt are struggling to adopt these new approaches while more progressive businesses who are leveraging a more cutting edge technology stack may have never done it any other way.
Outlook for the Upcoming Years
As a result, the next few years will see a shift in the cyber security environment with greater decentralization and increased regulation. According to Gartner, it is recommended for security leaders to consider a number of additional planning elements in their cyber security roadmap and strategy for the up coming years.
Data Privacy Regulations
According to a Gartner report, by the end of 2023, modern data privacy laws will cover the personal information of 75% of the world’s population. In 2018 GDPR was introduced as the first major consumer legislation for privacy in the EU. This was quickly followed by Turkey and Brazil and other countries and jurisdictions such as UK, Canada and California. Cyber security solutions for global enterprises will therefore need to start conforming to more than one regulation and/or legislation.
Zero Trust Cloud Security Solutions
In the effort to reduce cyber risk and optimize operations there will be additional focus by organizations to consolidation their technology stack. This will also apply to cyber security tools and applications. From this perspective, Security as a Service will become the preferred delivery method. By 2024, 30% of enterprises are predicted to deploy cloud-based Secure Web Gateway (SWG) and Cloud Access, Security Brokers (CASB), and Firewall as a Service (FWaaS) enforcing Zero Trust Network Access (ZTNA).
Security as Criterion of Doing Business
Organizations are increasingly looking to evaluate cyber security risk of other organizations they intend to do business with. This holds especially true for supply chain partners, ICT service providers; and also for mergers & acquisitions activities. As a result, there may be requests for more data about a partner’s cyber security profile, through surveys or security ratings. By 2025, 60% of organizations are predicted to use cyber security risk evaluation as the primary determinant in conducting third-party transactions and business relationships.
Negotiation as Part of Doing Business
As frequency, intensity and magnitude of cyber attacks increases, enterprises will look to establish formal negotiation protocols with cyber criminals. Cyber security experts and service providers will in turn need to increasingly start considering damage assessments due to security attacks and negotiations for ransomware payments at an overall business level. It is predicted that by 2025, 30% of global organizations will have engaged in formal negotiations with cyber criminals.
Blurring of Cyber and Physical Security
As corporate focus shifts towards overall combined operating resilience against cyber security, physical environmental safety and political stability, efforts towards digital and front office transformations will start to include an extra layer of complexity – especially for larger multi-vendor integration projects. This will be the case even more so where digital transformation extends to include IoT and other end-point devices (modality) connectivity. Cyber attacks are predicted to intensify in causing more that just business interruptions; but also inflict physical harm. By 2025, cyber-attackers will be able to use operational technology environments as weapons successfully enough to cause human casualties.
Security Labelling of Devices
With IoT devises becoming more and more infused into daily use, there will continue to be more emphasis on protecting connected devices and the cloud systems that tie them all together. The big initiative coming up in the US is a labelling system for IoT devices supported by the NIST recommendations for cyber security labelling for consumer IoT products. In 2021, Presidential Executive Order on Improving the Nation’s Cyber security directed NIST to initiate labelling programs on cyber security capabilities of Internet-of-Things (IoT) consumer devices. In 2022 NIST has started coordination with the Federal Trade Commission (FTC) and other agencies to identify IoT cyber security criteria for a consumer labelling program criteria for a consumer software labelling program.
The AI Element to Cyber Security
Not only is that ability of machine learning algorithms to examine and learn from the vast amount of data moving across networks in real-time far more effective than the human mind; it is also evolving at an accelerating pace. As a result, cyber security attacks exploiting the superior AI capability are also becoming more proficient and dangerous. It therefore only seems necessary that cyber security defences also leverage on this exponentially growing AI computing capabilities. According to IBM, enterprises that will use AI and automation to detect and respond to data breaches will comparatively save an average of $3 million. It is also been predicted that by 2030 the market for AI cyber security products will be worth close to $139 billion – a near tenfold increase on the value of the 2021 market.
Focus on Embedded Systems
There is continuing proliferation of cyber-physical systems. This include a variety of technologies like autonomous machineries (automobiles) that do not just performing repeated tasks but are becoming more AI driven; digital twining of physical systems to support their operation, maintenance and environments; and IoT device to improve quality-of-life and to deliver healthcare. All these prospects pose increasing real-world security risk for organizations and citizens with dual frontal attacks from the physical world and cyber echo systems. Focus is therefore increasing on continual assurance of secured application development, deployment and operations. In 2022, NIST started coordination with the US Federal Trade Commission (FTC) and other agencies to identify Secure software development practices. Best practices such as SecOps and DevSecOps are becoming a default mode of operation to ensure that security is at the core of developing and operating embedded systems that drive physical devices in a variety of consumer, social and community environments.
In Conclusion
Boundaries between the physical and cyber worlds are starting to blur. Consequently, focus on ensuring security and handling threats both in the corporate and consumer worlds is shifting to a more holistic resilience that includes both physical and cyber elements. Relying solely on “bolted on” reactive security measures as an afterthought to protect business application and operations is already proving to be ineffective. Drive to overall security resilience is forcing business leaders to be more strategic about including security measures as a core to conducting business transactions, developing applications and managing operations. As prospects of cyber security attacks causing physical damage and human casualty become more real, government regulations towards secure embedded systems development and standards for device security labelling will drive a conscious approach to “baking” in security as a preventative mindset. Businesses that fail to adopt and pivot to this holistic mindset and continue to handle security as a reactive tactical approach will soon find themselves to be in a severely compromised state.
Within the Rails there is a comprehensive testing structure embedded in the application that allows for continual testing over the course of building an application. The resulting test suite also serves as a safety net and as executable documentation of the application source code. When done right, writing tests also allows us to develop faster by quickly identifying and remediating defects – despite requiring extra code to be written.
Within Rails testing structure, principles of test-driven development (TDD) to write failing tests first, and then writes the application code to get the tests to pass can be easily applied. At the same time, Rails development is not prescriptive to TDD and these principles can be applied when convenient without being dogmatic about it
When and how often test sometimes also depends on individual development style and preferences. It is however helpful to understand why to test. At a high level, automated testing has three main benefits:
Tests protect against regressions, where a functioning feature stops working for some reason
Tests allow code to be refactored (i.e., changing its form without changing its function) with greater confidence.
Tests act as a client for the application code, thereby helping determine its design and its interface with other parts of the system.
Although none of the above benefits require that tests be written first, there are many circumstances where test-driven development (TDD) is a valuable tool to have in your kit. Deciding when and how to test depends in part on how comfortable you are writing tests. Many developers find that, as they get better at writing tests, they are more inclined to write them first. It also depends on how difficult the test is relative to the application code, how precisely the desired features are known, and how likely the feature is to break in the future.
In this context, it is helpful to have a set of guidelines on when we should test first; or test at all. Below are some guidelines for when to consider writing test cases:
When a test is especially short or simple compared to the application code it tests, lean toward writing the test first.
When the desired behavior is not yet crystal clear, lean toward writing the application code first, then write a test to codify the result.
When security is a top priority, err on the side of writing tests of the security model first.
Whenever a bug is found, write a test to reproduce it and protect against regressions, then write the application code to fix it.
Lean against writing tests for code that is likely to change in the future.
Write tests before refactoring code, focusing on testing error-prone code that’s especially likely to break.
In practice, the guidelines above mean that we will usually write controller and model tests first and integration tests (which test functionality across models, views, and controllers) second. When we’re writing application code that isn’t particularly brittle or error-prone, or is likely to change you may make a choice to skip testing altogether.
In Rails the main testing tools consist of controller tests, model tests, and integration tests. Integration tests are especially powerful, as they allow us to simulate the actions of a user interacting with our application using a web browser. Integration tests will eventually be our primary testing technique, but controller tests give us an easier place to start.
As an example to starting to build out a simple test aces lets take for example a simple application with a static Home and Help pages. In order to add an About page to our application, we will follow the above TDD guidelines to write the test first. We’ll then use the failing test to drive the writing of the application code.
If we had generated the static_pages controller using the generate command as below
$ rails generate controller StaticPages home help
A test file is also created in the following directory:
$ ls test/controllers
static_pages_controller_test.rb
test/controllers/static_pages_controller_test.rb
require ‘test_helper’
class StaticPagesControllerTest < ActionDispatch::IntegrationTest
test “should get home” do
get static_pages_home_url
assert_response :success
end
test “should get help” do
get static_pages_help_url
assert_response :success
end
end
In this file, you can see that there are two tests, one for each controller action we included when we generated the controller. Each test simply gets a URL and verifies (via an assertion) that the result is a success. Here the use of get indicates that our tests expect the Home and Help pages to be ordinary web pages, accessed using a GET request. The response :success is an abstract representation of the underlying HTTP status code (in this case, 200 OK). In other words the test scenario can be outlined as: “Let’s test the Home page by issuing a GET request to the Static Pages home URL and then making sure we receive a ‘success’ status code in response.”
To begin our testing cycle, we need to run our test suite to verify that the tests currently pass. We can do this with the rails command as follows:
Now that we have got all the test cases passing we make changes to or simple application by refactoring code and explore how continual testing can help us fix issues as we make changes.
For the purpose of this exercise we will edit the Home, Help, and About pages to make page titles that change on each page. This will involve using the <title> tag in our page views. Most browsers display the contents of the title tag at the top of the browser window, and it is also important for search-engine optimization.
We will start a TDD cycle by first by adding simple tests for our page titles, then by adding titles to each of our three pages, and finally using a layout file to eliminate duplication. By the end of this section, all three of our static pages will have titles of the form “<page name> | Ruby on Rails Tutorial Sample App”, where the first part of the title will vary depending on the page.
The rails new command always creates a layout file by default. Entries in this layout file are inherited by all views in the application. For now lets move this file temporarily by changing its name:
The HTML structure below would typically add a title to a page.
<!DOCTYPE html>
<html>
<head>
<title>Greeting</title>
</head>
<body>
<p>Hello, world!</p>
</body>
</html>
We will not describe HTML tags in this chapter except for this short description. Document type, or doctype, declaration at the top to tell browsers which version of HTML (in this case, HTML5); a head section, in this case with “Greeting” inside a title tag; and a body section, in this case with “Hello, world!” inside a p (paragraph) tag.
We will write simple tests for each of the titles fort the three pages by combining them with the tests we had written previously with an assert_select method, which lets us test for the presence of a particular HTML tag.
assert_select “title”, “Home | Ruby on Rails Tutorial Sample App”
In particular, the code above checks for the presence of a <title> tag containing the string “Home | Ruby on Rails Tutorial Sample App”.
Applying this idea to all three static pages gives the below test set:
test/controllers/static_pages_controller_test.rb
require ‘test_helper’
class StaticPagesControllerTest < ActionDispatch::IntegrationTest
test “should get home” do
get static_pages_home_url
assert_response :success
assert_select “title”, “Home | Ruby on Rails Tutorial Sample App”
end
test “should get help” do
get static_pages_help_url
assert_response :success
assert_select “title”, “Help | Ruby on Rails Tutorial Sample App”
end
test “should get about” do
get static_pages_about_url
assert_response :success
assert_select “title”, “About | Ruby on Rails Tutorial Sample App”
end
end
Running the test file will give us the following error:
Now that we have the functionality built and passing the test suite we can start refactoring code to make our application more efficient .
The first thing you will notice is that in the Static Pages controller test we have repeated base title, “Ruby on Rails Tutorial Sample App”. We can run a special function “setup” to get rid of this repetition.
test/controllers/static_pages_controller_test.rb
require ‘test_helper’
class StaticPagesControllerTest < ActionDispatch::IntegrationTest
def setup
@base_title = “Ruby on Rails Tutorial Sample App”
end
We can then replace the text with “| #{@base_title}” in each test case and run the test cases to make sure they still hold integrity.
The next thing you can note is tha each of the “home”, “help” and ‘about” have quite a bit of duplicated code: the page titles are almost the same; the entire HTML skeleton structure is repeated on each page.
This repeated code is a violation of the important Rails “Don’t Repeat Yourself” (DRY) principle.
Let us refractor the code to eliminate the duplicates and re-run the tests to verify that the titles are still correct. We will also start leveraging on embedded Ruby (ERb) in the views to achieve this refactoring. Since the “home”, “help”, and “about” views have titles have a variable component, we will use the “provide” function to set a different title in each view.
app/views/static_pages/home.html.erb
<% provide(:title, “Home”) %>
<!DOCTYPE html>
<html>
<head>
<title><%= yield(:title) %> | Ruby on Rails Tutorial Sample App</title>
</head>
.
</html>
Let us look in more detail of what <% provide(:title, “Home”) %> is doing:
<% … %> indicates for Rails to call the provide function and associate the string “Home” with the label :title. Then, <%= yield(:title) %> indicated rails to call the yield function to apply the associated “Home” string to the label :title.
We can do the same to all the three views and verify it works.
Now that we’ve replaced the variable part of the page titles with ERb, each of our pages looks something like this:
<% provide(:title, “Page Title”) %>
<!DOCTYPE html>
<html>
<head>
<title><%= yield(:title) %> | Ruby on Rails Tutorial Sample App</title>
</head>
<body>
Contents
</body>
</html>
In other words, all the pages are identical in structure, including the contents of the title tag, with the sole exception of the material inside the body tag.
In order to factor out this common structure, Rails comes with a special layout file called application.html.erb, which we renamed in the beginning of this section.
This code is responsible for inserting the contents of each page into the layout. At this time, it is not important to know exactly how this works; what matters is that using this layout ensures that all views converts the contents and then inserts it in place of <%= yield %>.
Finally, it is worth noting that the default Rails layout includes several additional lines:
<%= csrf_meta_tags %>
<%= csp_meta_tag %>
<%= stylesheet_link_tag … %>
<%= javascript_pack_tag “application”, … %>
This code arranges to include the application stylesheet and JavaScript, which are part of the asset pipeline, together with the Rails method csp_meta_tag, which implements Content Security Policy (CSP) to mitigate cross-site scripting (XSS) attacks, and csrf_meta_tags, which mitigates cross-site request forgery (CSRF) attacks.
Even though the tests are passing, there’s one detail left to deal with in the views. The duplicated HTML codes needs to be removed. Once this is removed the views will look mucs simpler as below:
With the above edits made to the application.html.erb file and to the three views, let us run the tes suite again to ensure we have maintained the functional integrity and not introduced any defects.
It would be good to commit these changes to Git:
$ git status # It’s a good habit to check the status before adding
$ git add -A
$ git commit -m “Finished refactering views”
$ git push
To reinforce the concepts let us now add a “contact” page using the principles applied above.
Write a test case for “contact” page in static_pages_controller_tests.rb file
Run the test suite after each one of the below steps to ensure the test suite finally passes passes without errors
Add the route to reoutes.rb
Define contact action in static_pages_controller.rb
Create a contact.html.erb view file
Now we can make one other tweak. Instead of the application root directing to index we can repoint it to home by making the following changes in the reoutes.rb file
root ‘application#index’
to
root ‘static_pages#home’
Now that you have redirected the the root to “home” it is a good idea to add a test case to the test suite in static_pages_controller.rb:
test “should get root” do
get static_pages_home_url
assert_response :success
end
before finishing up let us take a minute to commit the changes on our topic branch and merge them into the main branch.
$ git add -A
$ git commit -m “Finish static pages”
Then merge the changes back into the main branch using the same technique as in Section 1.3.4:16
Guard is a powerful application that can monitors changes in the filesystem so that when we …_controller_test.rb file is changed a a new test added only the new tests get run. Additionally when a controller or a view file is modified, the test suite in …controller_test.rb will run automatically.
The Gemfile build when we create a new Rails application already included the guard gem. It just needs to be initialized.
$ bundle _2.2.17_ exec guard init
We then edit the resulting Guardfile so that Guard will run the right tests when the integration tests and views are updated. Below is a suggested version of the Guardfile listed for your reference.
Reference Guardfile at railstutorial.org/guardfile
require ‘active_support/core_ext/string’
# Defines the matching rules for Guard.
guard :minitest, spring: “bin/rails test”, all_on_start: false do
On the cloud IDE, you have to run one additional step to allow Guard to monitor all the files in the project:
$ echo fs.inotify.max_user_watches=524288 | sudo tee -a /etc/sysctl.conf
$ sudo sysctl -p
Once Guard is configured, you should open a new terminal (as with the Rails server in Section 1.2.2) and run it at the command line as follows (Figure 3.11):
$ bundle _2.2.17_ exec guard
To run all the tests, simply hit return at the guard> prompt.
To exit Guard, press Ctrl-D.
To add additional matchers to Guard refer to the Guard README, and the Guard wiki.
If the test suite fails without apparent cause, try exiting Guard, stopping Spring
$ bin/spring stop # Try this if the tests mysteriously start failing.
$ bundle _2.2.17_ exec guard
Test Guard is working by making a small change to one of the views and saving the file.
Before finally finishing, you should add your changes and make a commit:
$ git add -A
$ git commit -m “Complete advanced testing setup”
$ git push
$ git push heruko
You now know how to:
Create a Rails development environment
Create a new application structure and deploy all the dependency bundles
Scaffold and edit the controllers, models, and views for specific application functionality
Use REST calls to create routes to manoeuvre through the Rails application
Develop test cases and leverage on a TDD structure within Rails
Version control locally and push out to a remote repository
Deploy you application so that it is accessible to external consumers
You are now a Ruby on Rails Novice! Start developing with Rails!
In this chapter will focus on quickly developing a basic Rails application to demonstrate the power of Rails and to reinforce the rudimentary concepts of Rails and web application development that we have discussed thus far. We will also introduce the steps of rapidly generating a user interactive Rails application using scaffold generator. This chapter will also introduce the concept of REST architecture as leveraged by Rails.
For the purpose of this exercise we will develop a twitter-like micro-posting application.
In this section, we will execute commands and make changes without providing too many explanations. Most of this is recap of what we have covered in the previous six chapters. Please refer to these previous chapters for more specific details.
$ rails –v #Display Rails version
$ gem update rails # Update Rails to 6.1.4.1
$ rails –v
$ruby –v #Display Ruby version
$ cd ~/environment
$ rails _6.1.4.1_ new demo_app #Generate the Demo App using Rails 6.1.4.1
$ cd demo_app/
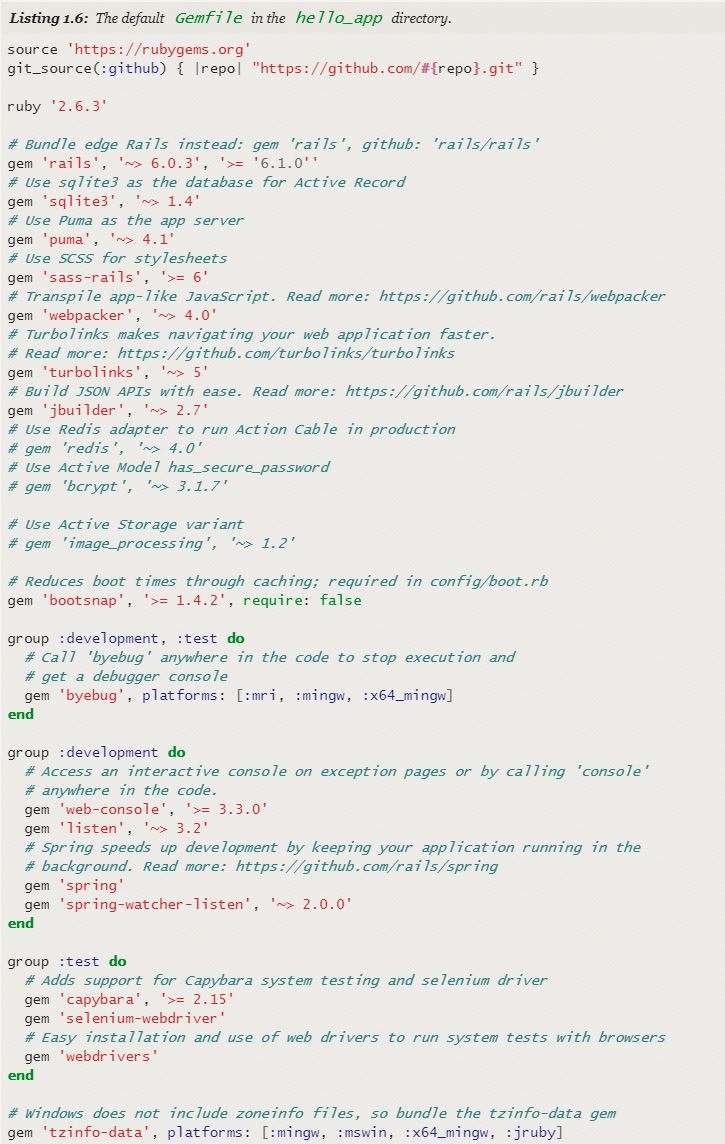
The next step is to look at the Gemfile in a text editor to make sure it has all the compatibilities. Below is a sample Gemfile to use for this application:
This again is recap from previous chapters but important steps to reiterate:
To prepare the system for deployment to production, we first run a special bundle config command to prevent the local installation of any production gems (which in this case consists of the pg gem)
$ cd demo_app
$$ gem list | grep “bundle” #List bundle version installed
$bundle update –bundler
$ bundle _2.2.30_ config set –local without ‘production’
Or
$ bundle config set –local without ‘production’
$ bundle _2.2.30_ install
Or
$ bundle install
Note: if you get errors installing ‘pg’, it is probably because you are missing lib-pg-dev library.
$ sudo apt-get install libpq-dev
Next add the application to the Git version control:
Create the first dummy page of the app to make sure it is running properly. You can always remove it with real application controller.
In app/controllers/application_controller.rb define a dummy controller add:
class ApplicationController < ActionController::Base
def demo
render html: “This is a dummy page for this Demo App”
end
end
In app/config/routers.rb add:
Rails.application.routes.draw do
# For details on the DSL available within this file, see #https://guides.rubyonrails.org/routing.html
root ‘application#demo’
end
Now commit the changes and push up to Heroku, and, at the same time, GitHub to keep the two copies in sync:
$ cd my-project/
$ git init
$ heroku create # Or create heroku app in Heroku
$ heroku git:remote -a railsdemoapp43534534
Deploy your application
Commit your code to the repository and deploy it to Heroku using Git.
$ git add .
$ git commit -am “make it better”
$ heroku stack # Dislay a list of heroku stacks available
$ heroku stack:set heroku-18 # Set heroku stack to heroku-18
$ git push heroku main
Once we have laid down the foundation of an application that can launch and be accessible to the outside world, we are in a good spot to start adding models and provide more structure and purpose to our application.
If the purpose of our simple app will be for a user to be able to make micro posts we can boil the application down to two interacting entities: a User and a Micropost. In a rails application this will translates to two models: Users and Microposts.
At this point it is worth noting the naming convention for Rails. Model are always named as plural. Hence we will create two models as below.
Users of the application will have a unique identifier called id (of type integer), a first name (of type string), last name (of type string) a publically accessible unique user handle (of type string) and an email address (also of type string) that will double as a unique username.
We will not assign a password at this time. We will add a password with we cover identity and access management later. In summary, the User model will look as such:
The core of the Micropost data model will be even simpler than the one for users. A micropost will have an id and a short text content and each post will be associated to a unique user. The association can be simply accomplished by recording the user_id of the owner of the post. The results in the following Microposts model:
We will first build a user in the rail application by implementing the Users data model along with a web interface to that model. The combination will constitute a Users resource, which will allow us to think of users as objects that can be created, read, updated, and deleted (CRUD) through the web via the HTTP protocol.
Users resource can be easily created using a scaffold generator program, which comes standard with each Rails project. In later chapters, we will create model resources manually be better understand Rails concepts and resource management.
Rails scaffolding is generated by passing the scaffold command to the rails generate script. The argument of the scaffold command is the singular version of the resource name (in this case, User). This is not to be confused with the plural version of the model.
$ rails generate scaffold User first_name:string last_name:string email:string
This commands executes the activities:
invoke active_record
create db/migrate/<timestamp>_create_users.rb
create app/models/user.rb
invoke test_unit
create test/models/user_test.rb
create test/fixtures/users.yml
invoke resource_route
route resources :users
invoke scaffold_controller
create app/controllers/users_controller.rb
invoke erb
create app/views/users
create app/views/users/index.html.erb
create app/views/users/edit.html.erb
create app/views/users/show.html.erb
create app/views/users/new.html.erb
create app/views/users/_form.html.erb
invoke test_unit
create test/controllers/users_controller_test.rb
create test/system/users_test.rb
invoke helper
create app/helpers/users_helper.rb
invoke test_unit
invoke jbuilder
create app/views/users/index.json.jbuilder
create app/views/users/show.json.jbuilder
create app/views/users/_user.json.jbuilder
invoke assets
invoke scss
create app/assets/stylesheets/users.scss
invoke scss
create app/assets/stylesheets/scaffolds.scss
If we now pause and take a look at the db/migrate/<timestamp>_create_users.rb file you will see code to crate a data base table users using the same attributes we assigned to the Users model. Under the app directory structure you will also note a controller/users_controller.rb and model/user.rb. Notice the use of plural singular format in controller and model. This is Rails convention. Get used to it!
To proceed with the application, the next step is to creat the table in the database using rails db:migrate command.
We can now run the local web server in a separate tab. Before we do that add the following configuration to the development environment for the server to run in Cloud9:
config/environments/development.rb
Rails.application.configure do
.
.
.
# Allow Cloud9 connections.
config.hosts.clear
end
$ rails server
But wait!
When we launch the application we don’t see anything different than the generic test we had added earlier. Did we do all that work for nothing?
Well, not actually.
In the background the Users resources created can be accessed in a very specific scaffold structure generated by Rails.
In generating the Users resource scaffolding, Rails has created a large number of pages for accessing and manipulating Users. For example, the page for listing all users is at /users, and the page for making a new user is at /users/new. Te table below shows the correspondence between these pages, URLs and corresponding actions.
URL Action Purpose
/users index page to list all users
/users/1 show page to show user with id 1
/users/new new page to make a new user
/users/1/edit edit page to edit user with id 1
Let us start interacting with the application by first displaying a list of users:
application_url/users
Add a new user by clicking on New Users to take you to:
application_url/users/new
You can access multiple other resource as indicated above.
A Few things to note: You can create a user without a first name or last name or email or any data. You can also delete a user with the application appropriately giving you a warning. This level of validation is not inherently built into Rails when scaffolding a model. We will have to add this manually later.
To update our database with the new data model, we need to run a migration again
$ rails db:migrate
Amongst other components, the scaffold has created a microposts_controller.rb, micropost.rb model amd view pages for microposts resource. We are now in a position to create microposts in the same way we created users.
Additionally, the config/routes.rb is now updated to include microposts resources
To make some actual microposts, we click on New Micropost on the micropost index.
As you create a few posts you will notice a couple of very obvious things. There is no restriction of how long the post can be; and the post dies not really tie to a user. To address this let us start adding some validation criteria to further define the Micropost model.
app/models/micropost.rb
class Micropost < ApplicationRecord
validates :content, length: { maximum: 40 }
end
If you try to create a post of more than 40 characters you will get a content validation error.
One of the most powerful features of Rails is the ability to form associations between different data models. In the case of our User model, each user potentially has many microposts. We can express this in code by updating the User and Micropost models.
Scaffolding Users resource is good to get us going quickly, but as we noted earlier, it suffers from a number of severe weaknesses.
MVC Recap
We have discussed the Model View Controller (MVC) structure in a previous Chapter 4. At this point it is worth taking a pause and revisiting how the MVC structure works in the background.
Here is a summary of the steps:
The browser issues a request for the /users URL.
Rails routes /users to the index action in the Users controller.
The index action asks the User model to retrieve all users (User.all).
The User model pulls all the users from the database.
The User model returns the list of users to the controller.
The controller captures the users in the @users variable, which is passed to the index view.
The view uses embedded Ruby to render the page as HTML.
The controller passes the HTML back to the browser.
Let us now look at things in a bit more detail.
When the application is launched with a application_url/ action, this is equivalent to index path designated by root in the config/routes.rb file. While we’re looking at the routes file, let’s take a moment to associate the root route with the users index, so that “slash” goes to /users
config/routes.rb
Rails.application.routes.draw do
resources :users
root ‘application#demo’
end
If we look at root ‘application#demo’ as the root action it points to the application controller and demo action defined in that controller and instructs the web webpage to render the html text.
In our case, if we want to use the index action in the Users controller, we can easily make that change by making the following change in the config/routes.rb file:
config/routes.rb
Rails.application.routes.draw do
resources :users
root ‘users#index’
end
Let us also take a pause and review the controller structure. A controller contains a collection of related actions, and the pages correspond to actions in the Users controller. The controller generated by the scaffolding is code class UsersController < ApplicationController. This is an example of a Ruby class with inheritance. We wll discuss inheritance briefly later.
app/controllers/users_controller.rb
class UsersController < ApplicationController
def index
def show
def new
def edit
def create
def update
def destroy
Note that index, show, new, and edit actions all correspond to pages, but there are additional create, update, and destroy actions as well. These actions don’t typically render pages (although they can). Instead, their main purpose is to modify information about users in the database.
Below is a full suite of controller actions that represent the implementation of the REST architecture in Rails. REST is based on the ideas of representational state transfer identified and named by computer scientist Roy Fielding. Note both the user show action and the update action correspond to the URL /users/1. The difference between them is the HTTP request method they respond to. We’ll learn more about HTTP request methods in later chapters.
At this time it is also worth while to examine the relationship between the Users controller and the User model. As an example let us focus on the index action.
app/controllers/users_controller.rb
class UsersController < ApplicationController
.
.
.
def index
@users = User.all
end
.
.
.
end
This index action has the line @users = User.all. This asks the User model to retrieve a list of all the users from the database and then places them in the variable @users.
The User comes equipped with a large amount of functionality because of inheritance – in particular, by using the Rails library called Active Record, the above code arranges for User.all to return all the users in the database.
The model itself is very rudimentary:
app/models/user.rb
class User < ApplicationRecord
end
However once the @users variable is defined, the controller calls the view. Variables that start with the @ sign, called instance variables, are automatically available in the views; in this case, the index.html.erb view iterates through the @users list and outputs a line of HTML for each one.
A controller can be defied with use the standard REST actions or action that correspond to static pages such as “home” or “help”.
The controller.rb file defines a Ruby class. Classes are simply a convenient way to organize methods like the home, help or othrr REST actions, which are defined using the def keyword. The angle bracket < indicates that Controller inherits from the Rails class ApplicationController. This means that our pages come equipped with a large amount of Rails-specific functionality
When you first generate the controller, all methods are initially empty:
def home
end
def help
end
In plain Ruby, these methods would simply do nothing. In Rails, but because it inherits from ApplicationController the behavior of its methods is specific to Rails. For instance when visiting the URL /static_pages/home, Rails looks in the Static Pages controller and executes the code in the home action (method), and then renders the view corresponding to the action. In the present case, the home action is empty, so all visiting /static_pages/home does is render the view called home.html.erb.
app/views/static_pages/home.html.erb
<h1>StaticPages#home</h1><p>Find me in app/views/static_pages/home.html.erb</p>
If you read much about Ruby on Rails web development, you’ll see a lot of references to REpresentational State Transfer or “REST”. REST is an architectural style for developing distributed, networked systems and software applications. REST, in the context of Rails applications, works on the principle that application components (such as users and microposts) are modeled as resources that can be created, read, updated, and deleted (CRUD). Operations correspond both to the CRUD operations of relational databases and to the four fundamental HTTP request methods: POST, GET, PATCH, and DELETE.
RESTful style of development helps you make choices about which controllers and actions to write and structure the application using resources that get created, read, updated, and deleted.
RESTful routes for the Users resource will look like below
HTTP request URL Action Purpose
GET /users index page to list all users
GET /users/1 show page to show user with id 1
GET /users/new new page to make a new user
POST /users create create a new user
GET /users/1/edit edit page to edit user with id 1
PATCH /users/1 update update user with id 1
DELETE /users/1 destroy delete user with id 1
Similarly the RESTful routes for the Microposts resource will look like below:
HTTP request URL Action Purpose
GET /microposts index page to list all microposts
GET /microposts/1 show page to show micropost with id 1
GET /microposts/new new page to make a new micropost
POST /microposts create create a new micropost
GET /microposts/1/edit edit page to edit micropost with id 1
PATCH /microposts/1 update update micropost with id 1
DELETE /microposts/1 destroy delete micropost with id 1
The Hypertext Transfer Protocol (HTTP) defines the basic operations GET, POST, PATCH, and DELETE. These refer to operations between a client computer on a web browser (or command line) and a server running a webserver. Rails is influenced by the REST architecture that includes al the calls including GET, POST, PATCH, and DELETE.
GET is the most common HTTP operation. It is used for reading data on the web. Every time you visit a site your browser is submitting a GET request.
POST is the next most common operation. It is the request sent by your browser when you submit a form. In Rails applications, POST requests are typically used for creating things and not update. (although HTTP also allows POST to perform updates).
The other two verbs, PATCH and DELETE, are designed for updating and destroying things on the remote server. Browsers are incapable of sending them natively but Rails makes it seem like browsers are issuing these requests.
We can examine the implications of the user–micropost association by using the console. The Rails console is a useful tool for interacting with Rails applications. We first invoke the console with rails console at the command line, and then retrieve the first user from the database using User.first (putting the results in the variable first_user). You can exit the console by entering the exit command.
$ rails console
>> first_user = User.first # assign the first user to variable first_user
(0.5ms) SELECT sqlite_version(*)
User Load (0.2ms) SELECT “users”.* FROM “users” ORDER BY “users”.”id” ASC
Let is add some more validation criteria to Users and Microposts resources;
Edit the user show page to display the content of the user’s first micropost.
Add a validation for the presence of micropost content in order to ensure that microposts can’t be blank.
Add a validation for the presence of user first name, last name and email in order to ensure that users can’t be blank.
Inheritance Hierarchies
In order to understand inheritance, it is of benefit to understand basic concepts of object-oriented programming (OOP), particularly classes and objects. We start with the inheritance structure for models. If we look at the Class defined in both the User model and the Micropost model inherit (via the left angle bracket <) from ApplicationRecord, which in turn inherits from ActiveRecord::Base, which is the base class for models provided by Active Record. It is by inheriting from ActiveRecord::Base that our model objects gain the ability to communicate with the database, treat the database columns as Ruby attributes, and so on.
app/models/user.rb
class User < ApplicationRecord
.
end
app/models/micropost.rb
class Micropost < ApplicationRecord
.
end
app/models/application_record.rb
class ApplicationRecord < ActiveRecord::Base
self.abstract_class = true
end
The inheritance structure for controllers is essentially the same as that for models. Both the Users controller and the Microposts controller inherit from the Application controller and ApplicationController itself inherits from ActionController::Base, which is the base class for controllers provided by the Rails library Action Pack.
As with model inheritance, both the Users and Microposts controllers gain a large amount of functionality by inheriting from a base class (in this case, ActionController::Base), including the ability to manipulate model objects, filter inbound HTTP requests, and render views as HTML. Since all Rails controllers inherit from ApplicationController, rules defined in the Application controller automatically apply to every action in the application.
Deploying the Demo App
Although not perfect, we have finished our development work according to the business requirements we were presented. If we were looking at things from a Lean Product Development perspective we have developed a Minimum Viable Product (MVC) with the completion of writing multiple microposts and associating them to a unique user. It is now time to push the repository up to GitHub:
First update local Git repository and then push to Github:
$ git status # It’s a good habit to check the status before adding
$ git add -A
$ git commit -m “Finish demo app”
$ git push
Next you can deploy the code from Github to Heroku:
$ git push heroku
This was too easy!
But wait if we go to the public URL for the application we will see the following error: “We’re sorry, but something went wrong.”
We can track down the problem by inspecting the Heroku logs:
$ heroku logs
Scrolling up in the logs, you should see a line that includes something like this:
ActionView::Template::Error (PG::UndefinedTable: ERROR: relation “users” does
not exist
This si because the users table is missing in production. One of the reason we are seeing this error as we try to fir up the application is because we rerouted root to Users Index action and also display the first micropost of the first user. To fix this we need to create or update the database structure in production. This is achieved by running the following migration command for heroku:
$ heroku run rails db:migrate
This updates the database at Heroku with the user and micropost data models as required. After running the migration, you should be able to use the toy app in production, with a real PostgreSQL database back-end!
Note: as this is a bran new installation all the data you entered in the development environment in AWS is local to that environment and nothing is brought over to Heroku production environment.
Finally you will have to remove the code to display the first user’s micropost in users/show.html.erb in order to get the app to load properly. In this case, simply delete the offending code, make another commit, and push again to Heroku.
Now that was too easy!
If you follow this blog without the side notes you should not have a problem scaffolding a similar application in less than a day. This is the power of Rails!
An application is useless sitting on your personal workstation or on a development server in the cloud. It needs to be deployed into a production environment so that it can be utilized by its consumers. Especially if you are working in a lean start up project, you need to get you MVP out to the user and solicit feedback as early as possible.
When deploying from a local workstation, Capistrano works well. However, Rails deployment tools on the cloud have matured quite rapidly. There are now a number of viable options to use to be able to effectively deploy your code into production. These include Phusion Passenger, Engine Yard Cloud and Rails Machine. We will however use Heroku.
Heroku is a hosted platform built specifically for deploying Rails and other web applications and makes deploying Rails applications easy and integrates well with Git. Heroku will work for the purposes for these tutorial. Once you get to deploying your commercial application, you can research and decide what deployment tool will work best for you.
Update Gem File
Heroku uses the PostgreSQL database. This means that you will need to update you need update your Gem file to include pg gem in the production environment to allow Rails to talk to Postgres.
group :production do
gem ‘pg’, ‘1.2.3’
end
SQLite database isn’t supported at Heroku. So make sure that the sqlite3 gem is not included in production environment and only included in development and test environments.
To prepare the system for deployment to production, we first run a special bundle config command to prevent the local installation of any production gems (which in this case consists of the pg gem)
$ bundle _2.2.13_ config set –local without ‘production’
Or
$ bundle config set –local without ‘production’
$ bundle _2.2.13_ install
Or
$ bundle install
Note: if you get errors installing ‘pg’, it is probably because you are missing lib-pg-dev library.
$ sudo apt-get install libpq-dev
Note: These are small changes do you done necessarily need to make a branch topic. You can simply make changes to your master and then commit them into Git and push them into GitHub. However, as you are actively working on the project, I suggest you get into the habit of coding best practice and make a branch topic that you can merge with the master after you have tested your changes.
$ git branch # Check if you have any current branches
$ git checkout -b Setup-Deployment # Create a new branch called and switched to branch
$ git branch # Make sure you are working in the new branch topic
Work in this branch and make your changes
$ git status # Get a summary of all the changes that you have made
$ git commit -a -m “Check in all the changes made and tested <date>”
$ git checkout master # Switched to branch ‘master’
$ git branch # Make sure you are in master and get name of branch to merge
The first thing to do to deploy Heroku is to create and configure a new Heroku account. Then check to see if your system already has the Heroku command-line client installed:
$ heroku/7.50.0 linux-x64 node-v12.16.2
This will display the current version number if the Heroku command-line interface (CLI) is available. On a Cloud9 IDE, you can install Heroku CLI using the following command:
You can now display the Heroku version by typing the following command:
$ heroku –version
heroku/7.50.0 linux-x64 node-v12.16.2
Once you have verified that the Heroku command-line interface is installed, use the heroku command to log in with the mail address and password you used when signing up (the –interactive option prevents heroku from trying to spawn a browser)
$ heroku login –interactive
Now use the ‘heroku create’ command to create a place on the Heroku servers for the sample app to live.
This command creates a new subdomain just for our application, available for immediate viewing. The next step is to deploy the application into this subdomain.
Heroku deployment, step 1
The first step is to use Git to push the master branch up to Heroku:
$ git push heroku master
You may get the following error:
remote: ! You are trying to install ruby-2.6.3 on heroku-20.
remote: !
remote: ! Ruby ruby-2.6.3 is present on the following stacks:
remote: !
remote: ! – cedar-14
remote: ! – heroku-16
remote: ! – heroku-18
This indicates that your app is built on ruby that is not supported with heroku-20. heroku-20 supports the following versions of ruby:
2.6.6, Rubygems: 3.0.3
2.7.2, Rubygems: 3.1.4
3.0.0, Rubygems: 3.2.3
To get around this error use a different heroku stack
$ heroku stack # Dislay a list of heroku stacks available
$ heroku stack:set heroku-18 # Set heroku stack to heroku-18
You will see a series of warning that you can ignore for now. When the deployment is completed you can use the URL that was created when you originally ran “heroku create”. To find the URL again you can run the following command:
Type the URL into you favorite browser and you will see “Hello World!” pop up in the browser. Congratulations! You have just deployed you first Rails application for everyone to access.
In future session we will talk about how to host a Heroku site using a custom domain instead of a herokuapp.com subdomain. But for now, job well done!
Naming Applications on Heroku
You can find a comprehensive list of Heroku commands on the Heroku Dev Center in the Heroku CLI Commands section. One common command is to rename your application. When you log into Heroku you will see a list of applications that you have deployed through Heroku. Heroku uses the generic name it gives to your application as the subdomain. This is however useless commercial application that you want people to easily access. You can change rename your application using the following command:
However for the reason that your “Hello World” application has no access management built in it, if you do want to rename your application, make sure it reasonably secure by using a random or obscure subdomain. Heroku also supports custom domains. Go to the Custom Domain Names for Apps on the Heroku Dev Center to get more information about custom domains.
To see a list of Heroku commands you can also run:
$ heroku help
Wrap Up
This is a good point to take a pause and recap on what you have covered in the previous chapters. In summary we have learned you to:
Set up a development environment
Scaffold a Rails application
Make functional changes to the default application
Version control locally and backup code to an online repository
Deploy the application for others to access online
At this time it would also be beneficial to summarise some key characteristics of Rails:
Rails is a web development framework written in the Ruby programming language
Rails can easily be installed and used do develop web applications using a preconfigured cloud environment
Rails default application can easily be generated with all the supporting structure with the a single “rails” command
Rails application comes with a local web server and can be run locally with a “rails server” command
The Model, View, Controller (MVC) framework makes it easy to manipulate controller actions and modify the root route to create a custom web application
Rails is well integrated with git to locally version control the application and protect against coding errors and mishaps
Rails is well integrated with GitHub to backup the application by pushig the version controlled code onto cloud resources
Rails is well integrated with resources like Heroku to quickly deploy the application using cloud resources
Now that we have a working “Hello World” application, we need to be able to secure it from calamities such as server crashes, accidentally deleting files and even making changes from which we would want to back out. Placing your application source code under version control is the best way to protect it. Version control systems allow tracking of changes to the code, collaborating with other developers on the project and rolling back changes.
Git is one of many options for a version control system. Some other options include: Subversion, CVS, Helix, ClearCase and many others. Git was originally developed by Linus Torvalds to host the Linux kernel. It has however now become one of the most popular system amongst Rails and Java development communities with popular implementations like GitHub and Bitbucket.
Git Setup and Configuration
The AWS cloud IDE includes Git by default, so no installation is necessary. You only need to do setup and configuration to make Git work for your projects.
Before using Git, you should perform a few one-time setup steps. These are system setups, meaning you have to do them only once on your development server.
The first (and required) step is to configure your name and email address, as shown below:
Note that the name and email address you use in your Git configuration will be available in any repositories you make public.
You can check you Git configurations with a simple list command
$ git config –list or git config -l
The next step is to prevent Git from asking for your GitHub password every time you want to use commands like push or pull. This is easily done by using the below command to configuring Git to remember passwords for on hour.
Once the basic configurations are done the fist step in using Git is to create a new repository. This is done by navigating to the root directory of you application and initializing a new repository:
$ cd ~/environment/hello_world
$ git init
Note that Git outputs a message that the repository has been reinitialized. This is because, as of Rails 6, running rails new automatically initializes a Git repository. Although, the git init step isn’t technically necessary in our case, this won’t hold for general Git repositories. It is therefore always good to initialize the repository.
The next step is to add all the project files to the repository
$ git add -A
This command adds all the files in the current directory apart from those that match the patterns in a special file called .gitignore. Therefore be very careful when you launch this command and make sure that you are in the right project directory – especially if you are working on multiple projects. The rails new command automatically generates a .gitignore file appropriate to a Rails project, but you can add additional patterns as well.
Run the below command to see what is in your .gitignore file. We will discuss changing this file in the following chapters.
$ cd ~/environment/hello_world
$ cat .gitignore
The project files added to the Git repository are initially placed in a staging area, which contains pending changes to your project. We can see which files are in the staging area using the status command:
$ git status
The output from this command will look something like this:
On branch master
No commits yet
Changes to be committed:
(use “git rm –cached <file>…” to unstage)
new file: .browserslistrc
new file: .gitignore
.
.
.
At the beginning of eh project you will see the entire project file structure in the list – except for what is called out in .gitignore. Moving forward you will see in this list only changes you have made to the project. It is a good idea to review this list carefully before you commit your changes to the Git repository. To tell Git you want to keep the changes, use the commit command:
The -m flag lets us add a message for the commit; if we omit -m, Git will open the system’s default editor and have us enter the message there. It is a good practice to always use the –m flag to keep a reference for each commit. You can see a list of the commit messages using the log command:
$ git log
The command will generate an output similar to below:
For large projects (like open source projects) where you have multiple contributors an multiple check-ins, this list can get long and run in your terminal for a while. Type q to quit the output from this command. It is also important to note that Git commits are local to the development server (workstation) you are working on.
Git in Action
So what does all this version controlling in Git do? Lets test out the value of version controlling by going through the below scenario example.
Suppose you’ve made some development changes and made incorrect edits or even deleted elements in your controller.
Simulate this my executing the following commands:
$ ls -ltr app/controllers/ # List all the files in you controllers directory
$ cd app/controllers # Change to the directory you are working in
$ cp application_controller.rb application_controller.rb.bak # Backup you controller file
$ rm application_controller.rb # Delete the controller file
$ ls – ltr # List all the files to not application_controller.rb is deleted
Now if you try to start you application and view it in a browser the browser will through a series of errors:
Puma caught this error: uninitialized constant ActionText::Engine::ApplicationController (NameError)
.
.
.
In a live web application situation this would cause a high severity customer issue and potential business loss. You can quickly track down what happened by comparing the status of your application to last stable code that was checked into Git:
$ git status
This command will give you an output like below:
On branch master
Changes not staged for commit:
(use “git add/rm <file>…” to update what will be committed)
(use “git checkout — <file>…” to discard changes in working directory)
(use “git add <file>…” to include in what will be committed)
app/controllers/application_controller.rb.bak
no changes added to commit (use “git add” and/or “git commit -a”)
You see here that a file has been deleted, but the changes are only on the “working tree”; they haven’t been committed yet. This means we can still undo the changes using the checkout command with the -f flag to force overwriting the current changes:
$ git checkout -f
Now if you list the file in the directory again you will note that you controller file is back in the directory
$ ls -ltr app/controllers/ # List all the files in you controllers directory
Try to run the application again. You will be able to pull up the “Hello World” browser page. Congratulations you are the hero of you project team!
Using GitHub
Now that you have your project versioned controlled and secured with Git, what is the purpose of GitHub? Are they not the same thing?
In fact, Git hub offer similar functionality but are used for two very different purposes. With Git, you can version control your project on your local machine. GitHub, is a site optimized for hosting and sharing Git repositories. Pushing your code onto GitHub serves as a full backup of your code in a remote location and it makes any future collaboration much easier in a development team.
To get started with GitHub simply sign up. Remember to use the same email address that you added earlier to your Git configuration. Once you have signed up or signed in, click on the + sign dropdown menu and select “New repository”.
On the new repository page, fill the fields with the repository name: hello_world (use the same name as your project) and optional description, and take special care to select the “Private” option. After clicking the “Create repository” button, you should see a page with a series of commands for adding an existing repository to GitHub.
Use the following commands to push your committed project to GitHub:
Using Rails automatically creates a README.md file when you create a new rails application. The filename extension .md, it is written in Markdown,23 a human-readable markup language designed to be easy to convert to HTML. You can customize this README fie to add some specific information about your project. Using Git it is possible to do this by following a branch, edit, commit, merge workflow.
Creating a branch effectively means creating a copy of the repository where we can make changes without modifying the parent files called the master branch. You can create a branch using the checkout command with the -b flag:
$ git checkout -b modify-README # Create a new branch called modify-README
# and switched to the new branch ‘modify-README’
$ git branch # Lists all the branches with * identifying the currently active branch
After creating the topic branch, you can edit the README to add custom content as you desire. With the changes made, you can take a look at the status of our branch:
$ git status
On branch modify-README
Changes not staged for commit:
(use “git add <file>…” to update what will be committed)
(use “git checkout — <file>…” to discard changes in working directory)
modified: README.md
no changes added to commit (use “git add” and/or “git commit -a”)
At this point, you could use git add -A, but git commit provides the -a flag as a shortcut for the (very common) case of committing all modifications to existing files:
$ git commit -a -m “Update the README file”
You have to be careful about using the -a flag improperly. If you have added any new files to the project since the last commit, you still have to tell Git about them using git add -A first.
Note to write the commit message in the present tense. Git models commits as a series of patches, and in this context it makes sense to describe what each commit does, rather than what it did. Moreover, this usage matches up with the commit messages generated by Git commands themselves.
Now that have committed your changes, you can merge the results back into our master branch
$ git checkout master # Switched to branch ‘master’
$ git merge modify-README
Once you have merged in the changes, you can clean up your branches by deleting the topic branch
It is not necessary to delete your topic branch. You can keep working in your topic branch even after you have merged in the changes. You can choose to merging in changes every time you reach a natural stopping point.
It’s also possible to abandon your topic branch changes, in this case with git branch -D:
$ git branch -D topic-branch # Unlike the -d flag, the -D flag will delete the branch even
# though we haven’t merged in the changes.
Now that you have updated the README file, you can push the changes up to GitHub
$ git push
Or
$ git push -u origin master
Now if you log into GitHub and navigate to your “Hello_World” project, you will note that the date stamp on the README.md file is updated. If you open the file you will also see the content updated.
You now know the basics of Git, GitHub and principles of code Branch, Edit, Commit, Merge and Push to manage your future Rails projects!
So you launched your new Rails application and you only see a generic static web page. This is not very exciting! Is Rails not all that is has cracked up to be?
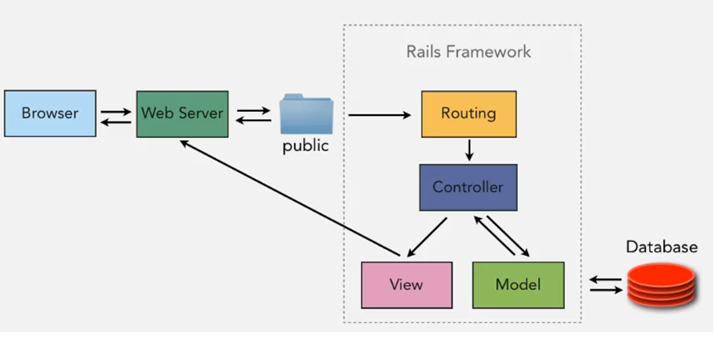
In order to answer this question at this stage, it would be helpful to get a high-level overview of how Rails applications work. In the “Hello World” Rails application directory structure you will notice a directory called app/. Under this directory you will notice, amongst other subdirectories, subdirectories called models, views, and controllers. Rails follows the model-view-controller (MVC) architectural pattern, which enforces a separation between the data in the application (such as user information) and the code used to display it. This is a common way of structuring a graphical user interface (GUI).
When interacting with a Rails application, a browser sends a request, which is received by a webserver and passed on to a Rails controller, which is in charge of what to do next. In some cases, the controller will immediately render a view, which is a template that gets converted to HTML and sent back to the browser. More commonly for dynamic sites, the controller interacts with a model, which is a Ruby object that represents an element of the site (such as a user) and is in charge of communicating with the database. After invoking the model, the controller then renders the view and returns the complete web page to the browser as HTML.
Do not worry if these MVC interactions seem a bit abstract at this time. We will cover MVC in a lot more detail in upcoming chapters.
Make You Application Say “Hello, World!”
In order to make the application do what you want it to do, you will need to start manipulating the MVC framework. In order for your application to say “Hello World!”, we will need to make some small change to the Hello World application by adding a controller action to render the string “Hello World!” to replace the default Rails page.
As implied by their name, controller actions are defined inside controllers. We will call our action hello and place it in the application controller. Run the following command to make sure that your application controller is the only controller:
$ ls app/controllers/*_controller.rb
When you run he above command, you should get the following output:
app/controllers/application_controller.rb
Open this controller file in the AWS IDE by dragging it from the listing side panel into a new file tab to view the current controllers. You will not this file is empty. It only contains the following lines:
class ApplicationController < ActionController::Base
end
This means that the controller has no instructions to provide to the application when a request is sent to it by the browser. The application therefore simply displays the default web page.
To have your application say “Hello World!” add the below instructions to the controller. At this time do nto be concerned about the Ruby syntax. We will cover this in detail in the upcoming chapters.
class ApplicationController < ActionController::Base
def hello
render html: “Hello World!”
end
end
The above syntax defines an action “hello” in the controller and includes the instructions to return the desired string.
Next we need to tell Rails to use that action we just defined instead of the default page. To do this, we will edit the Rails router, which sits in front of the controller and determines where to send requests that come in from the browser. In particular, we want to change the default page, the root route, which determines the page that is served on the root URL. Because it is the URL for an address like http://www.example.com/ (where nothing comes after the final forward slash), the root URL is often referred to as / (“slash”) for short.
The router is located in the following directory:
/app/hello_world/config/routes.rb
When you open the routes.rb file in a new file tab, you will note that the file only includes a comment directing us to the Rails Guide on Routing, which includes instructions on how to define the root route.
The syntax looks like this:
root ‘controller_name#action_name’
In the present case, the controller name is “application” and the action name is “hello”, which results in the code as shown below:
Rails.application.routes.draw do
root ‘application#hello’
end
With controller file and the router file saved restart you rails application with:
$ rails server
Then go to Preview and click on Preview Running Application, and then open it in a full browser window or tab; and Voilà! You will see “Hello World!” displayed on the applicant root web page!
Josh Gabriel and Dave Dresden comprising of the duo Gabriel & Dresden out of San Francisco have been on the electronic music and DJing scene for over two decades.
Their latest offering in the form of Remedy would make you think they are fresh on the scene with indie-inspired, current beats that are uplifting. In today’s short-sound-bite, single-track, short-attention-span mode of listening, the approach of each track blended into another is daring, but works really well. Not only does each track stand on its own merit it is stitched se well as an album that it will suck you in and take you on a fifty-minute journey that sneaks up on you before you realize it is over. The distinct vocals lent by Sub Teal (Brittany O’Neil), Jan Burton and rising star Centre compliment each track and make it unique.
The opening track “No One’s To Blame” sets the scene with simple synth, retro electro beats and unique vocals from Sub Teal. Centre’s soft, almost early vocals on “Remember” create a subtle tension. This along with “Falling Forward” and “All I’ve Got,” bring a refreshed flavor to the refined sound of Gabriel & Dresden sound. “Keep On Holding” brings us to somewhat darker vocals of Jan Burton but combined with uplifting sound and sharp beats by the duo take you sense on a bit of a trip. Sub Teal’s (Brittany O’Neil) solo vocals. “Will I Change” steal the show and are probably the highlight of the entire album. The strong club beats blending into “Coming On Strong” will get you and keep you on the floor – if not have you moving in your seat. “Luna” and “Twelve” are the only two tracks without vocals and they both provide a nice transition flow within the album. “Luna” is a more upbeat with a retro feel while “Twelve” has almost a retro techno sound that builds slowly into the big finish of the album with “Something Bigger”. This track has the most variability and tension to it with a high energy intro and body with slow haunting vocal breaks from Sub Teal (Brittany O’Neil).
According to the duo: “This is an album inspired by the comfort we can find when wrapped in nature”. I would say they hit the mark on what they were trying to achieve. This is a fantastic album and was on top of my list for 2020!
Review: This wine is fresh and fruity. It is very clear, light bodied with a beautiful tawny colour. It consists of a strong fruity bouquet to the nose. Its pleasant earthy aroma almost like soil after the first rain could be attributed to it being aged in concrete vats. This complimented with its strong mushroom and mint notes makes is a very delicious wine to taste. With 13 % alcohol, it has beautiful long legs. This adds to the drama when drinking this with as it almost feels infused. This would make a fantastic pairing with white meets; it would work really well as an aperitif ; and can also be enjoyed with an assortment of smoked meats and cheeses.
Keeping up with the age old tradition, this chapter will take you through creating a “hello, world” rails application. The application will displays the words “hello, world!” in a web browser. We will develop the application in our development environment and then push it live in the cloud.
As before the rails new command creates the skeleton of everything you need in a Rails application. To start log back into you’re the AWS Console using the IAM credentials you created earlier. Go into the Cloud9 service and pick the rails-dev environment you created earlier. Click on “Open IDE” and Cloud9 will boot up your rails-dev environment and connect you to it. Create the environment directory for your Rails projects if it doesn’t already exist and then change into the directory.
# Making an environment directory for Rails projects
# These steps are not needed on the cloud IDE.
$ cd # Change to the home directory.
$ mkdir environment # Make an environment directory.
$ cd environment/ # Change into the environment directory.
For the benefit of the Windows users macOS users who have never dared to open a shell terminal (This may be a surprise to some, but the OS X kernel is based in the Carnegie Mellon University Mach OS, which was itself derived from Berkeley Software Distribution (BSD) UNIX), below are some common Unix/Linux commands to get you going:
Description
Command
Example
list contents
ls
$ ls -l
make directory
mkdir <dirname>
$ mkdir environment
change directory
cd <dirname>
$ cd environment/
cd one directory up
$ cd ..
cd to home directory
$ cd ~ or just $ cd
cd to path incl. home dir
$ cd ~/environment/
move file (rename)
mv <source> <target>
$ mv foo bar
copy file
cp <source> <target>
$ cp foo bar
remove file
rm <file>
$ rm foo
remove empty directory
rmdir <directory>
$ rmdir environment/
remove nonempty directory
rm -rf <directory>
$ rm -rf tmp/
concatenate & display file contents
cat <file>
$ cat ~/.ssh/id_rsa.pub
Scaffold Hello World
The next step is to scaffold the first application using the rails command. Here you can explicitly include the Rails version number as part of the command. This firstly ensures that you are using the same version of Rails that you installed earlier to create the application. This also gives you the flexibility install and work with multiple versions of rails. A developer who is working on multiple Rails projects and versions can work form the same development machine. This is the power of Rails!
First make sure you are in the “environments” directory:
$ cd ~/environment
Create the first rails application by typing:
$ rails _6.0.2.2_ new hello_world
Now sit and watch the magic happen!
Rails creates all the structure that you need to get from ground zero to a minimal functioning application in very little time. This is one of the many advantages of Rails. Moreover, since the directory structure created by Rails is standard and common to all Rails application, you can get your bearings almost immediately when looking at someone else’s code.
We will discuss and learn about almost all the files and folders that Rails has just created for you in the remainder of these session. Below however is a list and a short description of some of the more predominant files and folders:
File/Directory
Purpose
app/
Core application (app) code, including models, views, controllers, and helpers
app/assets
Applications assets such as Cascading Style Sheets (CSS) and images
bin/
Binary executable files
config/
Application configuration
db/
Database files
doc/
Documentation for the application
lib/
Library modules
log/
Application log files
public/
Data accessible to the public (e.g., via web browsers), such as error pages
bin/rails
A program for generating code, opening console sessions, or starting a local server
test/
Application tests
tmp/
Temporary files
README.md
A brief description of the application
Gemfile
Gem requirements for this app
Gemfile.lock
A list of gems used to ensure that all copies of the app use the same gem versions
After creating a new Rails application, the next step is to use Bundler to install and include the gems needed by the app. Bundler is run automatically (via bundle install) by the rails command. In this section we will make some changes to the default application gems and run Bundler again.
This involves opening the Gemfile with a text editor. In the cloud IDE, this involves clicking the arrow in the file navigator to open the “hello_world” application directory and double-clicking the Gemfile icon.
The Gemfile is written in Ruby and will look something like below. We will review Ruby syntax in detail in future chapters.
The default Gemfile in the hello_world directory.
You will not that many of these lines are commented out with the hash symbol #. This means that that these gems are not installed or needed. For now, we will use the default gems.
Before we do into the details of the Gemfile below are some common uses of the “gem” command.
Unless you specify a version number to the gem command, Bundler will automatically install the latest requested version of the gem. This is the case, for example, in the code
gem ‘sqlite3’
There are also two common ways to specify a gem version range, which allows us to exert some control over the version used by Rails. The first looks like this:
gem ‘capybara’, ‘>= 2.15’
This installs the latest version of the capybara gem (which is used in testing) as long as it is greater than or equal to version 2.15 – even if it is version 7.2 as a major release.
The second method looks like this:
gem ‘rails’, ‘~> 6.0.2.2’
This installs the gem rails as long as it’s version 6.0.2.2 or newer but not 6.1 or newer.
In other words, the >= notation always installs the latest gem, whereas the ~> 6.0.2.2 notation will install the latest version of 6.0.2 in the same release version but not 6.1.0.10 as the minor release.
Unfortunately, experience shows that even minor releases can break Rails applications, so for this Ruby on Rails Tutorial we will err on the side of caution by including exact version numbers for all gems or use the most up-to-date version of any gem in the same release, including using the ~> construction in the Gemfile.
Converting the Gemfile to use exact gem versions results in the Ruby code shown below. A few things to note:
Arrange for the sqlite3 gem to be included only in a development or test environment. This will prevent future potential conflicts with the database used by Heroku.
Comment out the final line because it is specific to Microsoft Windows and results in a potentially confusing warning message on non-Windows systems. You should keep this line uncommented if you are running Rails on a native Windows system.
Removed the line specifying the exact Ruby version number. If your app fails to work without that line, you should definitely restore it.
A Gemfile with an explicit version for each Ruby gem will look something like this.
Before you edit your Gemfile make sure you back it up. In command line do the following:
$ cd ~/environment/hello_world/
$ cp Gemfile Gemfile.bak
Once you have made your change to the Gemfile save it and install the gems using “bundle install” command
$ cd hello_world/
$ bundle install
Once the bundle command is completed your application will have all the updated “gems” for you to run the application.
There is a chance that when you run the “bundle install” command you get a message saying you need to run “bundle update” first. In this case you should run “bundle update: before you rung “bundle Install”.
Running the Rails Server
Rails comes bundled a local webserver to assist us in developing you application. This wen server can be sterted using the “rails server” command. However, before running rails server, it’s necessary enable allowing connections to the local web server. To achieve this, you should navigate to the file config/environments/development.rb and ensure the following two lines are included in the “development.rb” file. If not, simply add them.
Rails.application.configure do
.
.
.
# Allow connections to local server.
config.hosts.clear
end
Run the “rails server” command in a second terminal tab so that you can still issue commands in the first tab. You can shut the server down using Ctrl-C
$ cd ~/environment/hello_world/
$ rails server
=> Booting Puma
=> Ctrl-C to shutdown server
To view the result of rails server on a native OS, paste the URL http://localhost:3000 into the address bar of your browser.
To view the result of rails server on a native OS, paste the URL http://localhost:3000 into the address bar of your browser.
On the cloud IDE If you don’t have the Run Configuration open, make sure you open a “New Run Configuration” tab. Then go to Preview and click on Preview Running Application, and then open it in a full browser window or tab. You will see the following message in the browser:
Congratulations! You have scaffold and launched your first Rails application!