
Using Unix Commands
Keeping up with the age old tradition, this chapter will take you through creating a “hello, world” rails application. The application will displays the words “hello, world!” in a web browser. We will develop the application in our development environment and then push it live in the cloud.
As before the rails new command creates the skeleton of everything you need in a Rails application. To start log back into you’re the AWS Console using the IAM credentials you created earlier. Go into the Cloud9 service and pick the rails-dev environment you created earlier. Click on “Open IDE” and Cloud9 will boot up your rails-dev environment and connect you to it. Create the environment directory for your Rails projects if it doesn’t already exist and then change into the directory.
# Making an environment directory for Rails projects
# These steps are not needed on the cloud IDE.
$ cd # Change to the home directory.
$ mkdir environment # Make an environment directory.
$ cd environment/ # Change into the environment directory.
For the benefit of the Windows users macOS users who have never dared to open a shell terminal (This may be a surprise to some, but the OS X kernel is based in the Carnegie Mellon University Mach OS, which was itself derived from Berkeley Software Distribution (BSD) UNIX), below are some common Unix/Linux commands to get you going:
| Description | Command | Example |
| list contents | ls | $ ls -l |
| make directory | mkdir <dirname> | $ mkdir environment |
| change directory | cd <dirname> | $ cd environment/ |
| cd one directory up | $ cd .. | |
| cd to home directory | $ cd ~ or just $ cd | |
| cd to path incl. home dir | $ cd ~/environment/ | |
| move file (rename) | mv <source> <target> | $ mv foo bar |
| copy file | cp <source> <target> | $ cp foo bar |
| remove file | rm <file> | $ rm foo |
| remove empty directory | rmdir <directory> | $ rmdir environment/ |
| remove nonempty directory | rm -rf <directory> | $ rm -rf tmp/ |
| concatenate & display file contents | cat <file> | $ cat ~/.ssh/id_rsa.pub |
Scaffold Hello World
The next step is to scaffold the first application using the rails command. Here you can explicitly include the Rails version number as part of the command. This firstly ensures that you are using the same version of Rails that you installed earlier to create the application. This also gives you the flexibility install and work with multiple versions of rails. A developer who is working on multiple Rails projects and versions can work form the same development machine. This is the power of Rails!
First make sure you are in the “environments” directory:
$ cd ~/environment
Create the first rails application by typing:
$ rails _6.0.2.2_ new hello_world
Now sit and watch the magic happen!
Rails creates all the structure that you need to get from ground zero to a minimal functioning application in very little time. This is one of the many advantages of Rails. Moreover, since the directory structure created by Rails is standard and common to all Rails application, you can get your bearings almost immediately when looking at someone else’s code.
We will discuss and learn about almost all the files and folders that Rails has just created for you in the remainder of these session. Below however is a list and a short description of some of the more predominant files and folders:
| File/Directory | Purpose |
| app/ | Core application (app) code, including models, views, controllers, and helpers |
| app/assets | Applications assets such as Cascading Style Sheets (CSS) and images |
| bin/ | Binary executable files |
| config/ | Application configuration |
| db/ | Database files |
| doc/ | Documentation for the application |
| lib/ | Library modules |
| log/ | Application log files |
| public/ | Data accessible to the public (e.g., via web browsers), such as error pages |
| bin/rails | A program for generating code, opening console sessions, or starting a local server |
| test/ | Application tests |
| tmp/ | Temporary files |
| README.md | A brief description of the application |
| Gemfile | Gem requirements for this app |
| Gemfile.lock | A list of gems used to ensure that all copies of the app use the same gem versions |
| config.ru | A configuration file for Rack middleware |
| .gitignore | Patterns for files that should be ignored by Git |
Using Bundler
After creating a new Rails application, the next step is to use Bundler to install and include the gems needed by the app. Bundler is run automatically (via bundle install) by the rails command. In this section we will make some changes to the default application gems and run Bundler again.
This involves opening the Gemfile with a text editor. In the cloud IDE, this involves clicking the arrow in the file navigator to open the “hello_world” application directory and double-clicking the Gemfile icon.
The Gemfile is written in Ruby and will look something like below. We will review Ruby syntax in detail in future chapters.
The default Gemfile in the hello_world directory.
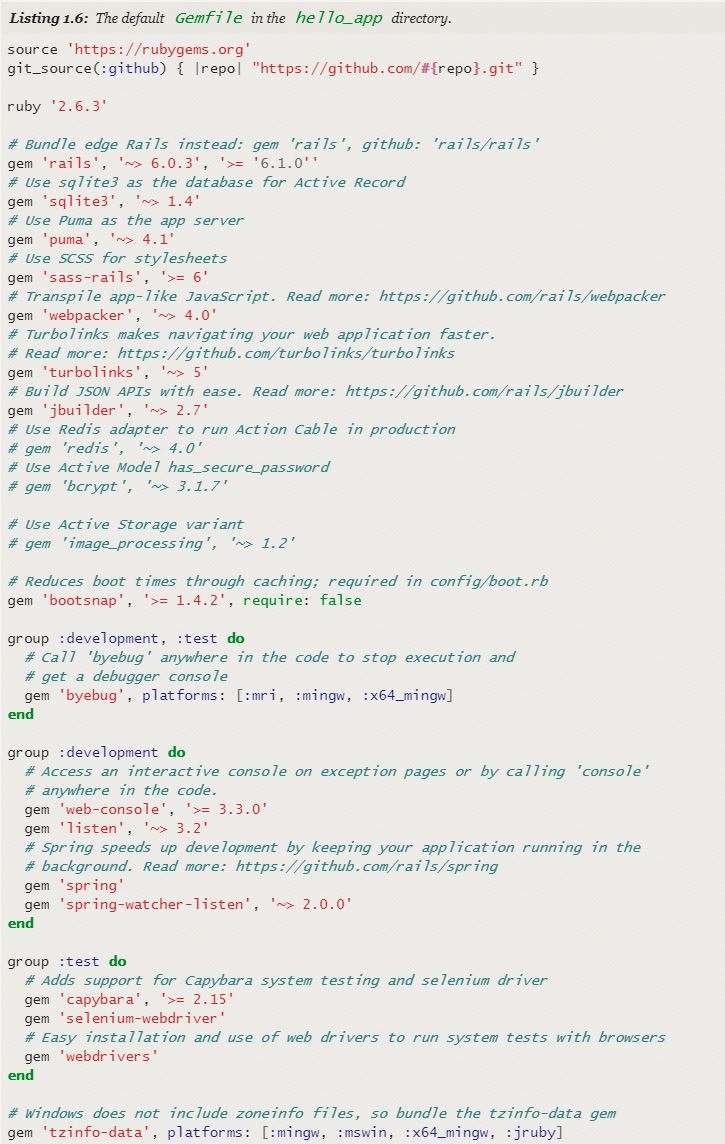
You will not that many of these lines are commented out with the hash symbol #. This means that that these gems are not installed or needed. For now, we will use the default gems.
Before we do into the details of the Gemfile below are some common uses of the “gem” command.
Unless you specify a version number to the gem command, Bundler will automatically install the latest requested version of the gem. This is the case, for example, in the code
gem ‘sqlite3’
There are also two common ways to specify a gem version range, which allows us to exert some control over the version used by Rails. The first looks like this:
gem ‘capybara’, ‘>= 2.15’
This installs the latest version of the capybara gem (which is used in testing) as long as it is greater than or equal to version 2.15 – even if it is version 7.2 as a major release.
The second method looks like this:
gem ‘rails’, ‘~> 6.0.2.2’
This installs the gem rails as long as it’s version 6.0.2.2 or newer but not 6.1 or newer.
In other words, the >= notation always installs the latest gem, whereas the ~> 6.0.2.2 notation will install the latest version of 6.0.2 in the same release version but not 6.1.0.10 as the minor release.
Unfortunately, experience shows that even minor releases can break Rails applications, so for this Ruby on Rails Tutorial we will err on the side of caution by including exact version numbers for all gems or use the most up-to-date version of any gem in the same release, including using the ~> construction in the Gemfile.
Converting the Gemfile to use exact gem versions results in the Ruby code shown below. A few things to note:
- Arrange for the sqlite3 gem to be included only in a development or test environment. This will prevent future potential conflicts with the database used by Heroku.
- Comment out the final line because it is specific to Microsoft Windows and results in a potentially confusing warning message on non-Windows systems. You should keep this line uncommented if you are running Rails on a native Windows system.
- Removed the line specifying the exact Ruby version number. If your app fails to work without that line, you should definitely restore it.
A Gemfile with an explicit version for each Ruby gem will look something like this.

Before you edit your Gemfile make sure you back it up. In command line do the following:
$ cd ~/environment/hello_world/
$ cp Gemfile Gemfile.bak
Once you have made your change to the Gemfile save it and install the gems using “bundle install” command
$ cd hello_world/
$ bundle install
Once the bundle command is completed your application will have all the updated “gems” for you to run the application.
There is a chance that when you run the “bundle install” command you get a message saying you need to run “bundle update” first. In this case you should run “bundle update: before you rung “bundle Install”.
Running the Rails Server
Rails comes bundled a local webserver to assist us in developing you application. This wen server can be sterted using the “rails server” command. However, before running rails server, it’s necessary enable allowing connections to the local web server. To achieve this, you should navigate to the file config/environments/development.rb and ensure the following two lines are included in the “development.rb” file. If not, simply add them.
Rails.application.configure do
.
.
.
# Allow connections to local server.
config.hosts.clear
end
Run the “rails server” command in a second terminal tab so that you can still issue commands in the first tab. You can shut the server down using Ctrl-C
$ cd ~/environment/hello_world/
$ rails server
=> Booting Puma
=> Ctrl-C to shutdown server
To view the result of rails server on a native OS, paste the URL http://localhost:3000 into the address bar of your browser.
To view the result of rails server on a native OS, paste the URL http://localhost:3000 into the address bar of your browser.
On the cloud IDE If you don’t have the Run Configuration open, make sure you open a “New Run Configuration” tab. Then go to Preview and click on Preview Running Application, and then open it in a full browser window or tab. You will see the following message in the browser:

Congratulations! You have scaffold and launched your first Rails application!
Read: Chapter 4. Introduction to Model-View-Controller (MCC)
Go Back to: Chapter 2. Getting Started with Rails
Go back to: Rails Rehashed

February 10th, 2021 at 4:50 am
[…] Go Back to: Chapter 3. My First Rails Application […]
March 6th, 2021 at 9:57 pm
[…] Go Back to: Chapter 3. My First Rails Application […]